

Introduction
The purpose of this guide is to promote the fine activity of Airshipping and to spur discussion on all the details that still remain a mystery. Consider the state of this guide to be "incomplete", although there will be plenty of updates as others add their observations and we learn more! If you are making your own guide, feel free to use any or all of the information from my posts. Just credit the Swiftsong FC from Phoenix, the finest team of airship enthusiasts I know -_-7
A few relevant things from the 3.1 patch notes!
New discoveries so far:
- The Diadem (hard): We have reports that it can be unlocked from sectors 18, 20, 21, and 22. It may be the case that it can be discovered at any rank 50 sector. There is some RNG involved, so it may take several attempts. If you are trying to unlock, try including more than one sector in your trip! \o/
- Dravanian mote discovered at sector 13 and sector 6!
- Wind Silk discoverd at sector 17, sector 13, sector 21, and sector 16 \o/
- Oriental Grass discovered at sector 14, sector 8 and sector 7!
- Potters Stone (rare) discovered at sector 10 and sector 1!
- Dinosaur Leather discovered at sector 19! \o/
This guide has a new co-author!
Nyalia, who manages our voyage reporting spreadsheet, happened to have the next post after mine in the thread! \o/ She has re-purposed it to post some of her own information and insights. There has been a lot of interest in what airship parts configurations make sense for level 50 ships, and she has a section all about that. Check it out!
Table of Contents
Tip: Use CTRL+F and type the name of a section to skip to itNyalia's Section (jump directly there)
- Unsolved Mysteries
- Quick Tips
- Airship Stats and Upgrade Recommendations
- Sector Information
- Walkthrough
- Interpreting the Voyage Log
- Community Resources
My co-author is Nyalia, the author of the famous Desynthesis Endgame Guide and the administrator of our airship log spreadsheet. Her section gives a more detailed look at some of the things we are learning from our data analysis, putting some of our speculation about things like airship stats to the test! \o/
- Ship Builder Tool
- Ship Stats
- Trip Time Calculations
- Endgame Range Values
- Endgame Ship Designs (check this out!)
- Understanding the Voyage Log
Unsolved Mysteries
I'm putting this section first because I'm just as greedy for more information as you are. If you have information on any of these details, please reply! I will update the guide as we learn more. You can help out a great deal by entering the data from your flight logs into this spreadsheet.
- What does each stat influence? Speed and range seem simple enough, but what about retrieval, surveillance, and favor?
- What conditions are necessary to unlock sectors? [Partly Solved]
What we know: Each sector is unlocked by a visiting another specific sector (see graphic below for details).
What we don't know: Does surveillance help? Does rank improve your chances? Does shaming your mammet motivate it? We just don't know, but we are looking into it. If you are having trouble unlocking a sector, my best advice at present is to just keep trying!- Where did all my coke go?
Fleet Infomation
Quick Tips
- If you just got your workshop and you are brand-new to airships in general, there is an super-handy guide by Z’an Tia of Midgardsormr! You'll find a helpful FAQ and a complete list of parts for each component.
- When building airship parts, don't worry too much about using HQ mats. It has no influence on the "quality" rating for each phase. The only benefit to using HQ mats is the exp bonus for making them and turning them in.
- Even though it is fairly easy to get plans for enterprise-type parts early on, I don't recommend skipping the invincible parts entirely. It is a long road to rank 15 on just bronco parts! Even after you get to 15, you won't be able to upgrade all four parts at once, there won't be enough capacity.
- Hang on to those bronco parts, and don't be shy about building upgrades, because you will get more than one use out of them. Upon visiting sector 8 you will unlock your 2nd airship! And there will be more on the way, you will eventually be able to have up to four airships.

Originally Posted by Aeyis


Airship Stats and Upgrade RecommendationsThe above descriptions represent the current best guess for what each of the stats contribute. If you have your own speculation that you can support with observations, please share! Speed and Range seem pretty straightforward, and I will share my rationale for Surveillance and Retrieval in a reply. The following are your upgrade options and guidelines for how to prioritize:
- Surveillance: May influence the probability of gathering a 2nd item per sector. May also influence the probability of finding new sectors.
- Retrieval: Increases item extraction rating (higher quantities of a specific item, better EXP bonus).
- Speed: Influences voyage duration. (more info)
- Range: Allows you to visit more sectors per voyage.
- Favor: ??? (Speculation: Probability of HQ, Influences weather conditions encountered)
Here is a table that shows how much airframe capacity you will have for new parts at certain levels, as well as EXP to level up (I'll need some help filling that in!). It is important to know that you get 1 additional airframe capacity per level, not just at the ones I've shown here.
Rank 50 Configurations
Nyalia's post below has a very detailed write-up on how to configure your rank 50 airships, along with some example configurations \o/
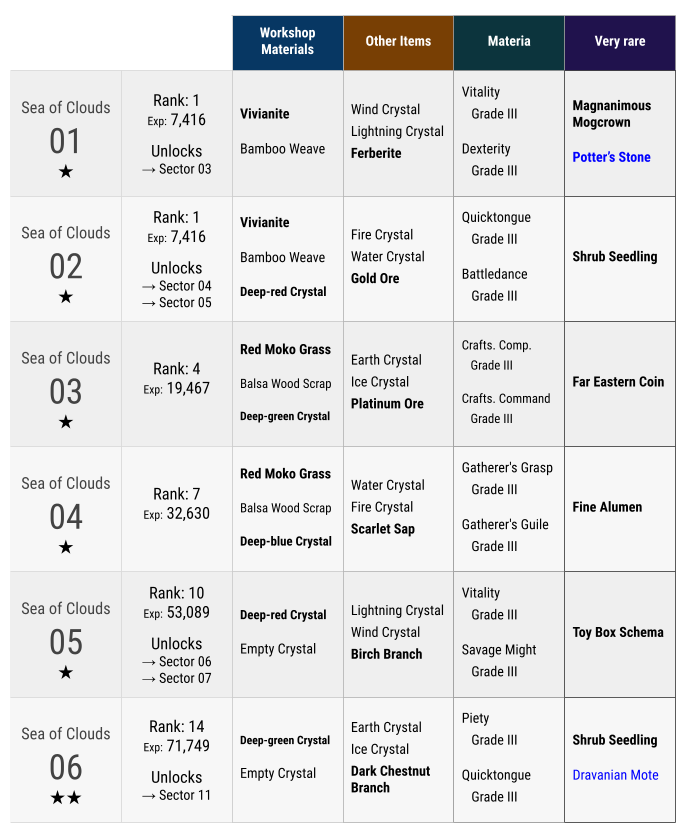
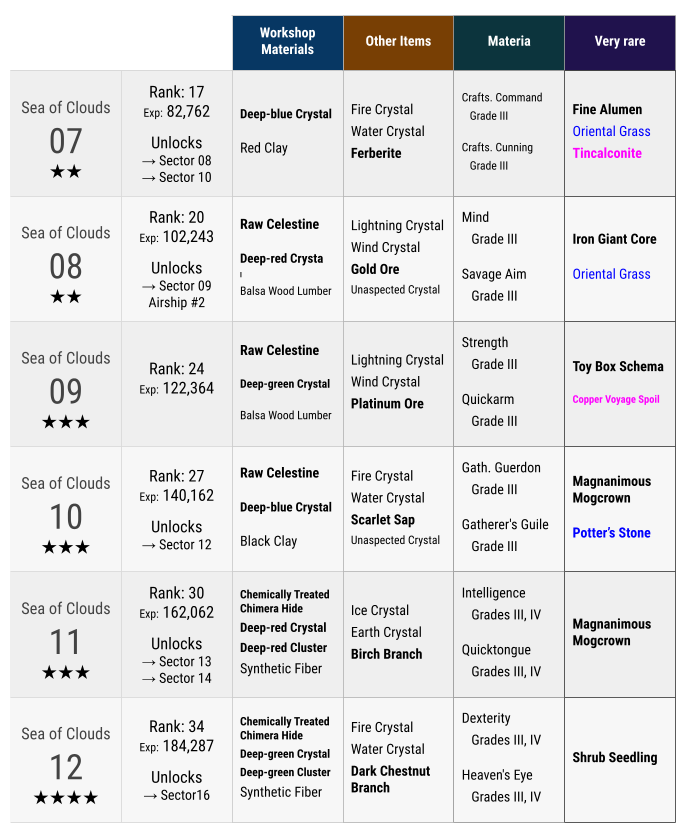
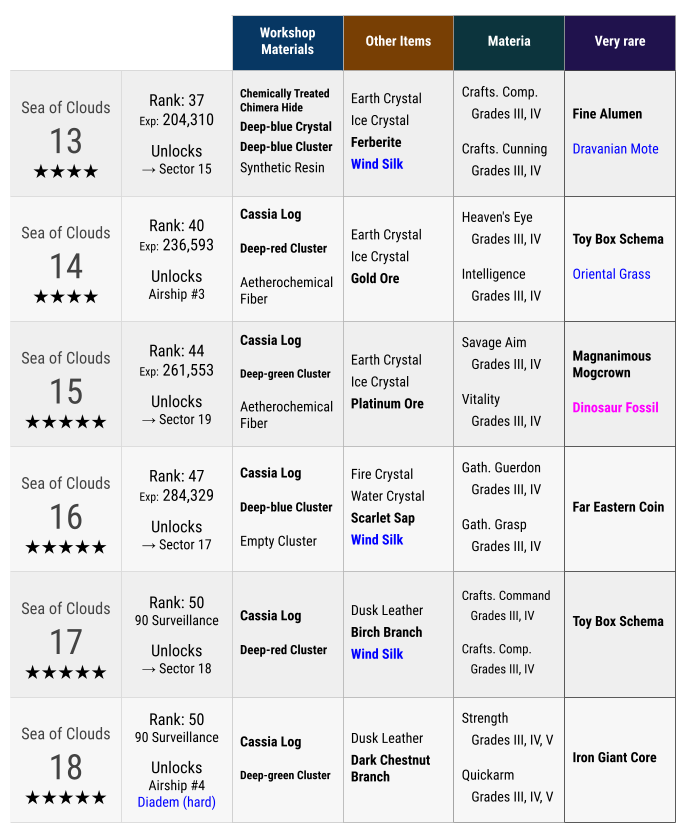
Sector Information
We need more reports to build this section, so share your discoveries! Some items are a higher tier, indicated by whether it says it is High-quality in the flight log. When you give your report, if you can include that information, that would help a lot! Items that are a high-quality tier are bolded. Items that are new to patch 3.1 are in blue!
Sector Map
The following is intended to serve as a visual guide for planning sector unlocks. There is some randomness involved with unlocking sectors, there appears to be roughly a 1 in 3 chance of for each visit. It is unclear if any stats contribute to your chance of success. Sometimes you might find yourself lucky and unlock a sector after 1-2 visits, and sometimes it might take a lot longer.
Unlocking sectors
When you report sector unlocks, please check out in the flight log which sector you visited. The discovery message will come after you visit the unlocking sector, as you begin to make your way to the next sector. The lines will look like this:
Survey of Sea of Clouds - Sector 05 complete. Elite performance rated as substandard. <-Sector that unlockedYou may not always see this message in your flight log when you unlock a sector. In fact, there is currently a bug that sometimes reports the wrong sector as being unlocked! If you can, also report what rating you got for the sector that unlocked the new one and what type of forecastle you are using.
Elite gains 79633 (+50%) experience points.
[]30h 53m elapsed -------------------
Changing course to Sea of Clouds - sector 4.
Sea of Clouds - Sector 7 discovered! <-Sector discovered

Thread: Airship Guide
-
07-07-2015 11:53 AM #1Player

- Join Date
- Oct 2013
- Posts
- 171
- Character
- Bonzai Ferroni
- World
- Phoenix
- Main Class
- Arcanist Lv 60
Airship Guide
(105)Last edited by BonzaiFerroni; 12-01-2015 at 10:08 AM.
-
07-07-2015 12:16 PM #2Player
- Join Date
- Oct 2013
- Posts
- 171
- Character
- Bonzai Ferroni
- World
- Phoenix
- Main Class
- Arcanist Lv 60
Walkthrough
So you and your company just finished building your airship, and you want to know what is in store? This section lays out a rough outline of the progress you will make and offers a few tips along the way. Company airships are a new and exciting part of Eorzea and we are learning new things every day. Take everything here with a grain of salt and don't hesitate to try things differently, it is the only way we will learn more \o/
Ranks 1 ~ 4: On a Wing and a Prayer
Name your airship something catchy and send her off into the wild blue yonder! You will have a limited number of sectors you can visit, but you'll have a chance to unlock more each trip. When planning trips to multiple sectors, try different flight paths to reduce your overall time. Take a look at your flight log and notice the pattern (for more detailed information, check out the Interpreting the Voyage Log section!). Consider adding your data to the rest of ours so we can learn more, and share any observations/speculations/musings by replying to this post.
Important items- Vivianite from sectors 1 and 2. You'll need these to build Garlond Steel, an important material for crafting your Invincible-type parts that you'll be able to start using at Rank 5. You only need 27 for your first part. Each airship part will need 27 vivianite (9 garlond steel) from here on! Don't worry about finding them all up front, you will have an additional airship to help you with that later on.
- Bamboo Weave from sectors 1 and 2. You will use these to unlock some of the airship prototypes. You'll need 6 for Prototype II (Invincible) and 18 total to have enough for all the prototypes.
- Red Moko Grass from sectors 3 and 4. Similar to vivianite, this will become important for crafting some of the Enterprise-type parts.
- Coke and Darksteel Ore: Although these are not items you'll get with your airship, your company would be wise to start hoarding these in large quantities as they will be needed to craft more parts!
Ranks 5 ~ 14: I'm Invincible! (Or a loony)
At rank 5 you will have your first chance to upgrade one of your parts. It is wise to upgrade parts one at a time as they become available rather than wait to upgrade all at once. At rank 5 you'll have 16 capacity which is enough to upgrade one part.
So... which part should you upgrade? There's no easy answer at the moment, some people believe surveillance is important in order to unlock sectors and progress faster. Some would recommend upgrading a part that will let you get EXP and rank up faster (Aftcastle, Hull, Rigging). At ranks 7 and again at 10 you will have enough airframe capacity to upgrade additional parts! Because it is a long road to rank 15, I recommend upgrading at least 1 or 2 of your bronco parts.
It is important not to neglect sector 5 in your trips, because that will ultimately unlock sector 7 which is important for later progress!
Important Items- Balsa Wood Scraps from sectors 3 and 4. This is another item that you'll need to unlock airship prototypes. You'll need 10 for Prototype III (Enterprise) and 14 total to have enough for all the prototypes.
- The "Deep" crystal set from sectors 5 (Red) 6 (Green) and 7 (Blue). You can use these to craft Aetherial Wheels. You'll probably be visiting these sectors anyway for the EXP, so why not?
Ranks 15 ~ 24: Lali-ho! Let's build the Enterprise
Upon reaching rank 15 you'll have access to Enterprise-type parts. Decisions about parts will start to become more complex. Should you finish building your invincible parts or skip to enterprise? As before, you will not be able to upgrade them all immediately, but will have the opportunity as rank-ups increase your airframe capacity. At rank 18 you will have capacity for three invincible parts and one enterprise part.
At around rank 17 you'll be able to visit sector 7, which is important for unlocking sector 8. If you haven't unlocked sector 7 try visiting sector 5 again. Upon rank 20 and visiting sector 8, you'll gain access to your 2nd airship!
From here on out, the "important items" pattern will stay consistent with what you've already seen. For each tier of airship, there will be an item that unlocks the prototype (e.g., Balsa Wood Lumber, Synthetic Fiber) and also an item that is necessary to craft the materials (e.g., Vivianite, Red Moko Grass). If you review the sector info tables, you will see which sectors give each one of these items.
Most of the time you should find yourself with plenty of airship parts crafting items without having to make special trips, the one exception might be with Vivianite, since garlond steel is used in nearly every part after bronco. The easy solution is to just include sectors 1 or 2 in your trips if you find yourself running low! They are right next to your home base so they are on the way for pretty much any voyage.
Rank 25 and beyond: East or West?
By now you already have a sense of how everything works, and there won't be any major surprises from here on out. When your airship reaches rank 50, you'll start to measure your progression in how many sectors you've unlocked. Unlocking sectors can take a bit of patience, as you may have already discovered. It is all about luck and perseverance.
When your flagship reaches rank 50, it might be time to change your strategy from maximize exp to maximize chances to unlock new sectors. At present, we don't know whether any specific stat is important, and it is starting to seem unlikely. The only sure-fire way to improve your odds is to take more trips! You can outfit your flagship with the best rigging you have and consider sending it out on short voyages to only sectors that have a potential to unlock new sectors. Sometimes you might be able to hit more than one sector with potential in a single trip (e.g., a trip from 11-15 to have a chance to unlock both 14 and 19), and other times it might be best to make single-sector voyages.
An interesting choice you can make is whether you want to take the eastern path of sectors or the western path. Take a look at the graphic below:
As you can see, there are two distinct sector chains, one that begins with 11 in the west and another that begins with 10 in the east. It is up to you whether you want to tackle both at once or pick one. The advantage to going east is that you will find a new airship upon reaching sector 18. The advantage to going west isn't quite clear yet, no one has fully explored it! There is an advantage to making progress on both routes, the sectors closer to the middle are near enough that you can visit a sector from each route in a single voyage, giving you twice the potential to unlock new sectors.
Alternative Approach: The Minimalist Workshop
Through experimentation, we've discovered that it is possible to make steady progress at least up through sector 11 using only the original bronco airship parts. For those who don't have the luxury of being able to come up with materials for parts easily, and especially for those who are running very small or solo FCs, this means they won't have to invest in every set of parts along the way.
If you plan to eventually use all four airships and have the most flexibility in airship configurations at higher levels, it is still really handy to make each set of parts as they become available. For example, right around when you discover your 2nd airship, you be able to use all four invincible parts making your old bronco parts available for your new ship. This trend will continue for your 3rd and 4th airships.
But if you are happy with just a single airship, you can make steady progress and make very few parts along the way. For sector 17 and beyond you will need at least an Enterprise forecastle, since 90 surveillance is the minimum requirement. However, that seems to be the only minimum requirement that we've encountered so far. It may just be possible to discover all 24 sectors with only the original bronco parts and an enterprise forecastle. I'll be testing this idea, stay tuned!
Interpreting the voyage log
Reading the voyage log is a great way to know which component to upgrade next. At the top you will find your rating, your base EXP, and your EXP bonus. You will also see the items gathered during the voyage. The Flight Log is the really interesting part. Each sector you will encounter 1-2 "nodes" that your airship will extract items from. The pattern will look like this (I've added notes):
Sea of Clouds - Sector 06 reached. Commencing Survey.
Experiencing high winds. Airship surveillance levels unaffected, but exploratory capability may be slightly hindered.This seems to influence your "surveillance level", which influences whether you can gather items. Possible conditions:
High-quality deep green crystals discovered. Commencing extraction.
-None = No penalty.
-High winds = Slightly hindered.
-Turbulence = Significantly hindered.Some items appear to be more rare than others. This line tells you whether that is the case. The chances may be influenced by a specific stat (surveillance, favor). Possible conditions:
High retrieval levels results in above-average extraction yield.
_______________ discovered.
High-quality _____________ discovered.
Several high-quality _____________ discovered.Extraction results can be: Normal, High, Optimal, ???
3 deep green crystals retrieved!
Additional anomalies detected. Continuing exploration.If your surveillance level for a given sector remains sufficient, you will gather an additional item. If this is the case, the above log pattern will repeat.
Survey of Sea of Clouds - Sector 06 complete. SS Rubber Ducky performance rated as satisfactory.Performance rating for a sector seems to be the average of extraction ratings.
-Abysmal (normal): +0% exp
-Substandard (normal-high) +50% exp
-Satisfactory (high) +100%
-Decent (high-optimal) +150% exp
-???
Community Resources
There are other great sources of airship information out there, here are just a few that have come to my attention! If you know of any others, please share \o/
Tools and Spreadsheets- FFXIV Airship Logs - Database - Maintained by Nyalia, this is the official data spreadsheet of this guide. It has many other features, including a Ship Builder and Trip Planner. (more information below in her post!)
- FFXIV Airship Logs - Quick Reference - Another of Nyalia's spreadhsheets, has a trip planner and a shipbuilder, among other things (previously part of the database spreadsheet).
- FFXIV Airship Logs - Analysis - Probably uninteresting to most people, this is where we will run our analyses on the database.
- Workshop by Opercival Aurora of Cactuar - A complete list of materials for each workshop project, including airship parts and other crafts. Just save a copy to your own Google Drive and use it to keep track!
- FFXIV Airship Parts by Mystic Spirit of Phoenix - Similar to the above, this is a great reference for materials required for each airship part.
- FFXIV Airship Components by Daleria Duskweaver of Zalera - Very useful if you want to build multiple parts in a single session! After making a copy on your own google drive, use this spreadsheet to automatically generate a list of all the materials needed for multiple parts.
- Route Planning Tool by the Pom Exploration Team - "This planner can map out the flight distance, return time, ceruleum tank costs, and Airship requirements for trips between 1-5 islands up to Sector 19. We're still working out a few kinks with sharing it, but we're open to more feedback and ideas too!"
- Airship Calculator - Display all the materials you need to build those airship parts!
- Airship Components Calculator - By Arstas and Soleillante - This is a unique tool that will let you select which airship parts you currently own and minimum stat values and will output combinations of parts to fit to your ships and maximize stats!
Other Guides- Mithrie's Introduction to Airships and the Workshop (YouTube) - As always, an excellent video from Mithrie that gives an introduction to the workshop and using airships. (Note: When building airship parts in the workshop, I do not believe HQ materials affect your chance of getting quality gains, its the only minor tidbit I'd add)
- FFXIV Wiki - Free Company Airships - A wiki with some of the same basic information that you might find in this guide, including a list of items per sector.
- FFXIV Heavensward: Free Company Airship Guide by Aywren - A simple guide with visuals that covers building your first airship and sending her off on her maiden voyage! \o/
- FFXIV Airship Guide by Z’an Tia of Midgardsormr - You'll find a helpful FAQ that covers introductory information and a complete list of parts for each component.
Discussion- Bluegartr Forum - FC Airship General - Another great source for airship-related discussion!
(43)Last edited by BonzaiFerroni; 12-01-2015 at 10:22 AM.
-
07-08-2015 02:44 AM #3Player

- Join Date
- Jun 2014
- Location
- Gridania
- Posts
- 1,683
- Character
- Neri Feralheart
- World
- Faerie
- Main Class
- Paladin Lv 90
Hi! Bonzai asked me if I would co-author the guide and use this space to list key info and suggestions so they weren't buried in the guide. For now, this will be an assortment of information that I know. Anything that's not proven will be listed as such. To ease reading the guide, I have discovered spoiler tags. I'll put most of the data behind them so you can browse the information more easily.
Ship Builder Tool
Go here and click File -> Make a Copy to get your own Ship Builder tool.
Spreadsheets
I have created three spreadsheets for tracking, displaying, and analyzing airship-related data. When editing editable fields on these sheets, please, please, please do not use ctrl-x, ctrl-v, straight "cut" or "paste" menu commands, or click and drag one cell to another. All of these cause headaches. To paste one cell's contents into another, please instead right-click on the cell, choose "Paste Special," and then choose "Paste Values Only." This will prevent formatting from being copied and prevent cell references in formulas from being changed accidentally. If you ever see an error or otherwise want to comment on an uneditable field, please use the "insert comment" feature. I will respond to the comment when I can, and when the issue is resolved, either of us can "Resolve" the comment making it go away. View the spoiler text for details on each sheet.
FFXIV Airship Logs: This is the sheet where people can log their voyages. It also has a Ship Builder tool and a Trip Planner tool. If you would like to help maintain this sheet by copying data from the public tab to the master tab (correcting typos as you do so), please contact me privately. My contact info is located on the sheet's "cover" tab.
- Master Voyage Log: This is our voyage log database. It is periodically sorted by ship name, then by rank, then by submission order. Each ship's logs are colored based on the color the that ship's captain chose for the ship in the Airship Roster tab.
- Public Voyage Log: This is where you can share logs of your voyages. Logs entered here will be periodically copied over to the Master Voyage Log. This two-step process allows us to correct spelling errors and verify that each log does not contain mistakes that would confuse the data. If your ship gets the message that says a second item was found but your ship's condition was insufficient to retrieve it, please leave the second item fields blank. For the winds, "Violent turbulence" in the log is what we're calling "Turbulence" in the sheet. The "no wind" message is weirdly worded and mentions something about "2 surveillance levels" - despite looking odd, that's the standard "no wind" message. The "Rare?" column is asking about the "High Quality" or "Several High Quality" message included in the log, not the HQ/NQ status of the item itself. Please always include the experience value of your trip even if your ship's rank is maxed. This value is used as a sort of "checksum" to verify your sector ratings and the sectors listed are correct. It's easy for a log entry to have such errors (especially trailing new line characters or spaces in the sector name field), and this is an easy way for us to notice and correct them.
- Airship Roster: Here, you can list your ship if you'd like. If you specify a color, that color will be used for your ship on the Master Voyage Log tab. You can also use this tab to find out what other FCs on your server are playing with airships, which can help if you're short on an FC crafting or schematic material. This tab is periodically sorted by server, then FC, then rank, then ship name.
- Sector List: This tab contains both details on each sector and what items drop from each sector. The item list is dynamically generated, but the field on the far right contains items that were reported elsewhere but have not yet appeared in logs entered on the sheet.
- Item List and Static Item List: The Item List tab is purely dynamic. It lists all items found, what sectors they were found in, and what quantity ranges were reported for each Retrieval rating. Please note that the full range of Retrieval levels was not present from the start (I hadn't realized there were "Low" and "Subnormal" values until later on), and some of the data may be skewed by that. The Static Item List is a manually-entered list of the items, grouped into categories, with a list of the sectors I either know or believe the item will be found in. (To the right is a dynamically generated list of all sectors where the item was reported and how many reports there are of each - this is used to identify outliers that could be typos.)
- Ship Builder: The Ship Builder lets you see what part combinations will result in what stats. The current version allows up to four ships to be designed at once. Please share.
- Trip Planner: This tool allows you to figure out efficient paths. To add a sector to your trip, click on the cell to the left of the sector's name and press enter twice. To remove a cell from the trip, select the "x" to the left of the sector's name and press the "delete" key. The distance shown for each sector is the minimum Range adding that sector will add to the trip if the sector was optimally placed (not including the flat per-sector cost of 13!) for sectors not currently in the trip. For sectors currently in the trip, it shows the amount of range (again not including the flat 13) that will be gained by removing that sector from the trip. It will also show an estimated time for the trip based on the specified Speed stat, and the trip will be shown in optimal path order. Only 1-3 sector trips are supported at this time.
FFXIV Airship Logs - Quick Reference: This sheet contains sector and item lists as well as a Ship Builder tool and a Trip Planner tool. It does not contain the log database. No data on this sheet is dynamically generated. This sheet also contains the backup Public Voyage Log tab for when the master log sheet has too much traffic for anonymous users to edit it. If you're just looking for data and have no logs to enter, this sheet should run faster and smoother.
- Sector List: This tab contains both details on each sector and what items drop from each sector. The item chart is nearly complete (it only has one item missing at the moment).
- Item List: This tab lists each item that can be obtained by an Airship Venture and what sectors it can be found in.
- Ship Builder: The Ship Builder lets you see what part combinations will result in what stats. The current version allows up to four ships to be designed at once. Please share.
- Trip Planner: This tool allows you to figure out efficient paths. To add a sector to your trip, click on the cell to the left of the sector's name and press enter twice. To remove a cell from the trip, select the "x" to the left of the sector's name and press the "delete" key. The distance shown for each sector is the minimum Range adding that sector will add to the trip if the sector was optimally placed (not including the flat per-sector cost of 13!) for sectors not currently in the trip. For sectors currently in the trip, it shows the amount of range (again not including the flat 13) that will be gained by removing that sector from the trip. It will also show an estimated time for the trip based on the specified Speed stat, and the trip will be shown in optimal path order. Only 1-3 sector trips are supported at this time.
- Sector Map: This is a sector map that was generated from the x, y coordinates Lauphin Faux of Sargatanas derived for each sector (with "Home" located at (0, 0)). Drawn on it are arrows indicating which sectors unlock which other sectors and lines separating the three elemental regions. Sectors in the left region contain Earth and Ice crystals, ones in the middle region contain Lightning and Wind crystals, and ones in the right region contain Fire and Water crystals. While this information isn't terribly useful right now, I suspect it will be useful for determining what clusters will be found in which sectors when we can visit the islands ourselves.
FFXIV Airship Logs - Analysis: This is the sheet where we run various calculations on the data provided by the airship logs. It is periodically updated with a copy of the master voyage log. If you would like to run calculations on the data yourself, please contact me with your google account name so I can add you. My contact info is located on the cover tab.
Ship Stats
Here is what we know about ship stats:- Survey: Endgame (rank 50) sectors require your ship to have a minimum of 90 Survey in order to visit those sectors.
- Range: Your Range stat must be equal to or greater than the total distance of each leg of your route plus 13 per stop.
- Retrieval: While this is not definitive, Retrieval does correlate with the retrieval levels obtained. Visiting endgame sectors with low Retrieval often results in "Low" or "Subnormal" results, while visiting early sectors with high Retrieval often results in "High" or "Optimal" results.
- Speed: Each trip has a fixed base time of 12 hours. Except for that fixed base time, all of the rest of the trip time is inversely related to your Speed stat. So, if a trip would take your ship 32 hours to complete (12+20), if you doubled your Speed, it would then take 22 hours to complete (12+10).
- Favor: While this is not definitive, favor does correlate strongly with the per-sector ratings.
There are many theories about what else these stats do apart from the above. The most interesting theory for what Survey actually does (apart from the minimum requirement) is that it influences whether or not you get a second item. My research into this idea shows a correlation between Survey and second items, but not a strong one. There also appears to be a correlation between sector number/rating/fuel cost and 2nd items, with later sectors having a lower chance with the same Survey. Again, these correlations are weak, and there are so many variables, it's hard to control properly for the experiment.
Trip Time Calculations
Lauphin Faux of Sargatanas has figured out the formula for determining how long a trip will take. There are three components to every trip: Base Time, Survey Time, and Travel Time.- Base Time: Every trip has a fixed Base Time of exactly 12 hours, so for every trip, Base Time (in minutes) = 720
- Survey Time: The Survey Time is based on the total number of Cerulean Barrels the trip requires. However, sectors that require 6 barrels are treated as if they actually took 8. The formula is: Survey Time (in minutes) = Total Barrel Value * 12600 / Speed
- Travel Time: It is important to note that distances used in the Travel Time formula are NOT the distances the game shows. The game actually calculates the distances from the precise coordinates of the sector and uses the distance formula to determine how far apart two sectors are. All trips start at the "home" sector and end at the final sector that you visit. Your mammot pilot casts Return from there. The game's formula uses values that are floored at various points in the calculation, making the value the game uses differ slightly from the one given by the formula shown here. However, this formula is a very close estimate: Travel Time (in minutes) = Total Distance * 1150 / Speed
Endgame Range Values
Once you start getting ships to rank 50 and have most of the sectors unlocked, you're going to want to start farming for items. Hitting only one sector is generally inefficient for two reasons - there's a 12 hour base time added to every trip, and endgame sectors are generally closer to each other than they are to home. Hitting 2 or 3 of these in one trip should get you far more items than single trips will. To this end, here are a list of the range values you need for various endgame sector sets and what special items each contains. I am counting SC13 and SC16 as "endgame sectors" because they contain grade IV Crafter and Gatherer materia.
Two-sector Pairs
- Range 63: SC18 > SC21 - Dusk Leather x2, Deep Green Cluster x2, Iron Giant Core, Toy Box Schema
- Range 64: SC18 > SC17 - Dusk Leather x2, Deep Red Cluster, Deep Green Cluster, Iron Giant Core, Toy Box Schema, Crafter Materia
- Range 65: SC13 > SC19 - Dusk Leather, Deep Blue Cluster, Iron Giant Core, Fine Alumen, Crafter Materia
- Range 68: SC18 > SC20 - Dusk Leather x2, Deep Red Cluster, Deep Green Cluster, Iron Giant Core x2
- Range 68: SC16 > SC17 - Dusk Leather, Deep Red Cluster, Far Eastern Coin, Toy Box Schema, Crafter & Gatherer Materia
- Range 69: SC17 > SC21 - Dusk Leather x2, Deep Red Cluster, Deep Green Cluster, Toy Box Schema x2, Crafter Materia
- Range 70: SC18 > SC22 - Dusk Leather x2, Deep Green Cluster, Deep Blue Cluster, Iron Giant Core x2, Gatherer Materia
- Range 70: SC21 > SC22 - Dusk Leather x2, Deep Green Cluster, Deep Blue Cluster, Iron Giant Core, Toy Box Schema, Gatherer Materia
- Range 70: SC21 > SC20 - Dusk Leather x2, Deep Red Cluster, Deep Green Cluster, Iron Giant Core, Toy Box Schema
- Range 71: SC17 > SC22 - Dusk Leather x2, Deep Red Cluster, Deep Blue Cluster, Iron Giant Core, Toy Box Schema, Crafter & Gatherer Materia
- Range 71: SC18 > SC19 - Dusk Leather x2, Deep Green Cluster, Deep Blue Cluster, Iron Giant Core x2
- Range 72: SC13 > SC18 - Dusk Leather, Deep Green Cluster, Iron Giant Core, Fine Alumen, Crafter Materia
- Range 73: SC18 > SC16 - Dusk Leather, Deep Green Cluster, Far Eastern Coin, Iron Giant Core, Gatherer Materia
- Range 74: SC19 > SC20 - Dusk Leather x2, Deep Red Cluster, Deep Blue Cluster, Iron Giant Core x2
- Range 74: SC13 > SC20 - Dusk Leather, Deep Red Cluster, Iron Giant Core, Fine Alumen, Crafter Materia
- Range 76: SC13 > SC21 - Dusk Leather, Deep Green Cluster, Toy Box Schema, Fine Alumen, Crafter Materia
- Range 77: SC17 > SC20 - Dusk Leather x2, Deep Red Cluster x2, Iron Giant Core, Toy Box Schema, Crafter Materia
- Range 78: SC20 > SC22 - Dusk Leather x2, Deep Red Cluster, Deep Blue Cluster, Iron Giant Core x2, Gatherer Materia
- Range 79: SC16 > SC22 - Dusk Leather, Deep Blue Cluster, Far Eastern Coin Iron Giant Core, Gatherer Materia x2
- Range 79: SC21 > SC19 - Dusk Leather x2, Deep Green Cluster, Deep Blue Cluster, Iron Giant Core, Toy Box Schema
- Range 79: SC16 > SC21 - Dusk Leather, Deep Green Cluster, Far Eastern Coin, Toy Box Schema, Gatherer Materia
- Range 82: SC13 > SC17 - Dusk Leather, Deep Red Cluster, Toy Box Schema, Fine Alumen, Crafter Materia x2
- Range 84: SC13 > SC22 - Dusk Leather, Deep Blue Cluster, Iron Giant Core, Fine Alumen, Crafter & Gatherer Materia
- Range 84: SC17 > SC19 - Dusk Leather x2, Deep Red Cluster, Deep Blue Cluster, Iron Giant Core, Toy Box Schema, Crafter Materia
- Range 86: SC19 > SC22 - Dusk Leather x2, Deep Blue Cluster x2, Iron Giant Core x2, Gatherer Materia
- Range 86: SC16 > SC20 - Dusk Leather, Deep Red Cluster, Far Eastern Coin, Iron Giant Core, Gatherer Materia
- Range 90: SC13 > SC16 - Far Eastern Coin, Fine Alumen, Crafter & Gatherer Materia
- Range 92: SC16 > SC19 - Dusk Leather, Deep Blue Cluster, Far Eastern Coin, Iron Giant Core, Gatherer Materia
Three-sector Triplets (range 100 or less)
- Range 83: SC18 > SC21 > SC22 - Dusk Leather x3, Deep Green Cluster x2, Deep Blue Cluster, Iron Giant Core x2, Toy Box Schema, Gatherer Materia
. - Range 83: SC18 > SC21 > SC20 - Dusk Leather x3, Deep Red Cluster, Deep Green Cluster x2, Iron Giant Core x2, Toy Box Schema
. - Range 86: SC18 > SC21 > SC17 - Dusk Leather x3, Deep Red Cluster, Deep Green Cluster x2, Iron Giant Core, Toy Box Schema x2, Crafter Materia
. - Range 87: SC18 > SC17 > SC16 - Dusk Leather x2, Deep Red Cluster, Deep Green Cluster, Far Eastern Coin, Iron Giant Core, Toy Box Schema, Crafter & Gatherer Materia
. - Range 88: SC13 > SC19 > SC20 - Dusk Leather x2, Deep Red Cluster, Deep Blue Cluster, Iron Giant Core x2, Fine Alumen, Crafter Materia
. - Range 89: SC18 > SC17 > SC22 - Dusk Leather x3, Deep Red Cluster, Deep Green Cluster, Deep Blue Cluster, Iron Giant Core x2, Toy Box Schema, Crafter & Gatherer Materia
. - Range 89: SC17 > SC21 > SC22 - Dusk Leather x3, Deep Red Cluster, Deep Green Cluster, Deep Blue Cluster, Iron Giant Core, Toy Box Schema x2, Crafter & Gatherer Materia
. - Range 89: SC17 > SC21 > SC20 - Dusk Leather x3, Deep Red Cluster x2, Deep Green Cluster, Iron Giant Core, Toy Box Schema x2, Crafter Materia
. - Range 91: SC16 > SC17 > SC21 - Dusk Leather x2, Deep Red Cluster, Deep Green Cluster, Far Eastern Coin, Toy Box Schema x2, Crafter & Gatherer Materia
. - Range 91: SC18 > SC20 > SC19 - Dusk Leather x3, Deep Red Cluster, Deep Green Cluster, Deep Blue Cluster, Iron Giant Core x3
. - Range 92: SC18 > SC21 > SC19 - Dusk Leather x3, Deep Green Cluster x2, Deep Blue Cluster, Iron Giant Core x2, Toy Box Schema
. - Range 93: SC18 > SC20 > SC22 - Dusk Leather x3, Deep Red Cluster, Deep Green Cluster, Deep Blue Cluster, Iron Giant Core x3, Gatherer Materia
. - Range 93: SC20 > SC21 > SC22 - Dusk Leather x3, Deep Red Cluster, Deep Green Cluster, Deep Blue Cluster, Iron Giant Core x2, Toy Box Schema, Gatherer Materia
. - Range 93: SC13 > SC18 > SC21 - Dusk Leather x2, Deep Green Cluster x2, Iron Giant Core, Toy Box Schema, Fine Alumen, Crafter Materia
. - Range 93: SC21 > SC20 > SC19 - Dusk Leather x3, Deep Red Cluster, Deep Green Cluster, Deep Blue Cluster, Iron Giant Core x2, Toy Box Schema
. - Range 94: SC13 > SC18 > SC17 - Dusk Leather x2, Deep Red Cluster, Deep Green Cluster, Iron Giant Core, Toy Box Schema, Fine Alumen, Crafter Materia x2
. - Range 94: SC18 > SC19 > SC13 - Dusk Leather x2, Deep Green Cluster, Deep Blue Cluster, Iron Giant Core x2, Fine Alumen, Crafter Materia
. - Range 94: SC13 > SC19 > SC21 - Dusk Leather x2, Deep Green Cluster, Deep Blue Cluster, Iron Giant Core, Toy Box Schema, Fine Alumen, Crafter Materia
. - Range 94: SC13 > SC20 > SC21 - Dusk Leather x2, Deep Red Cluster, Deep Green Cluster, Iron Giant Core, Toy Box Schema, Fine Alumen, Crafter Materia
. - Range 94: SC17 > SC18 > SC20 - Dusk Leather x3, Deep Red Cluster x2, Deep Green Cluster, Iron Giant Core x2, Toy Box Schema, Crafter Materia
. - Range 96: SC17 > SC22 > SC20 - Dusk Leather x3, Deep Red Cluster x2, Deep Blue Cluster, Iron Giant Core x2, Toy Box Schema, Crafter & Gatherer Materia
. - Range 96: SC16 > SC17 > SC22 - Dusk Leather x2, Deep Red Cluster, Deep Blue Cluster, Far Eastern Coin, Iron Giant Core, Toy Box Schema, Crafter Materia & Gatherer Materia x2
. - Range 96: SC13 > SC21 > SC22 - Dusk Leather x2, Deep Green Cluster, Deep Blue Cluster, Iron Giant Core, Toy Box Schema, Fine Alumen, Crafter & Gatherer Materia
. - Range 97: SC16 > SC18 > SC21 - Dusk Leather x2, Deep Green Cluster, Far Eastern Coin, Iron Giant Core, Toy Box Schema, Gatherer Materia
. - Range 97: SC17 > SC18 > SC19 - Dusk Leather x3, Deep Red Cluster, Deep Green Cluster, Deep Blue Cluster, Iron Giant Core x2, Toy Box Schema, Crafter Materia
. - Range 98: SC13 > SC18 > SC20 - Dusk Leather x2, Deep Red Cluster, Deep Green Cluster, Iron Giant Core x2, Fine Alumen, Crafter Materia
. - Range 98: SC17 > SC21 > SC19 - Dusk Leather x3, Deep Red Cluster, Deep Green Cluster, Deep Blue Cluster, Iron Giant Core, Toy Box Schema x2, Crafter Materia
. - Range 99: SC16 > SC22 > SC21 - Dusk Leather x2, Deep Green Cluster, Deep Blue Cluster, Far Eastern Coin, Iron Giant Core, Toy Box Schema, Gatherer Materia x2
. - Range 99: SC13 > SC20 > SC22 - Dusk Leather x2, Deep Red Cluster, Deep Blue Cluster, Iron Giant Core x2, Fine Alumen, Crafter & Gatherer Materia
. - Range 99: SC19 > SC20 > SC22 - Dusk Leather x3, Deep Red Cluster, Deep Blue Cluster x2, Iron Giant Core x3, Gatherer Materia
. - Range 99: SC13 > SC21 > SC17 - Dusk Leather x2, Deep Red Cluster, Deep Green Cluster, Toy Box Schema x2, Fine Alumen, Crafter Materia x2
. - Range 99: SC16 > SC17 > SC20 - Dusk Leather x2, Deep Red Cluster x2, Far Eastern Coin, Iron Giant Core, Toy Box Schema, Crafter & Gatherer Materia
. - Range 99: SC16 > SC21 > SC20 - Dusk Leather x2, Deep Red Cluster, Deep Green Cluster, Far Eastern Coin, Iron Giant Core, Toy Box Schema, Gatherer Materia
. - Range 100: SC19 > SC21 > SC22 - Dusk Leather x3, Deep Green Cluster, Deep Blue Cluster x2, Iron Giant Core x2, Toy Box Schema, Gatherer Materia
. - Range 100: SC13 > SC19 > SC22 - Dusk Leather x2, Deep Blue Cluster x2, Iron Giant Core x2, Fine Alumen, Crafter & Gatherer Materia
. - Range 100: SC13 > SC18 > SC22 - Dusk Leather x2, Deep Green Cluster, Deep Blue Cluster, Iron Giant Core x2, Fine Alumen, Crafter & Gatherer Materia
. - Range 100: SC17 > SC20 > SC19 - Dusk Leather x3, Deep Red Cluster x2, Deep Blue Cluster, Iron Giant Core x2, Toy Box Schema, Crafter Materia
Four-sector Quads (select trips)
- Range 96: SC07 > SC10 > SC16 > SC17 - Dusk Leather, Deep Red Cluster, Deep Blue Crystal, Far Eastern Coin, Magnificent Mogcrown, Toy Box Schema, Fine Alumen, Materia: Gatherer III x2, Crafter III x2, Gatherer IV, Crafter IV
. - Range 103: SC08 > SC18 > SC20 > SC19 - Dusk Leather x3, Deep Red Cluster, Deep Green Cluster, Deep Blue Cluster, Iron Giant Core x4
. - Range 103: SC10 > SC17 > SC21 > SC22 - Dusk Leather x3, Deep Red Cluster, Deep Green Cluster, Deep Blue Cluster, Iron Giant Core, Magnificent Mogcrown, Toy Box Schema x2, Materia: Gatherer III x2, Crafter III, Gatherer IV, Crafter IV
. - Range 105: SC10 > SC16 > SC17 > SC22 - Dusk Leather x2, Deep Red Cluster, Deep Blue Cluster, Far Eastern Coin, Iron Giant Core, Magnificent Mogcrown, Toy Box Schema, Materia: Gatherer III x3, Crafter III, Gatherer IV x2, Crafter IV
. - Range 105: SC08 > SC18 > SC20 > SC22 - Dusk Leather x3, Deep Red Cluster, Deep Green Cluster, Deep Blue Cluster, Iron Giant Core x4, Materia: Gatherer IV
. - Range 106: SC18 > SC21 > SC20 > SC19 - Dusk Leather x4, Deep Red Cluster, Deep Green Cluster x2, Deep Blue Cluster, Iron Giant Core x3, Toy Box Schema
. - Range 107: SC18 > SC17 > SC21 > SC22 - Dusk Leather x4, Deep Red Cluster, Deep Green Cluster x2, Deep Blue Cluster, Iron Giant Core x2, Toy Box Schema x2, Materia: Gatherer IV, Crafter IV
. - Range 107: SC18 > SC17 > SC21 > SC20 - Dusk Leather x4, Deep Red Cluster, Deep Green Cluster x2, Iron Giant Core x2, Toy Box Schema x2, Materia: Crafter IV
. - Range 108: SC18 > SC20 > SC21 > SC22 - Dusk Leather x4, Deep Red Cluster, Deep Green Cluster x2, Deep Blue Cluster, Iron Giant Core x3, Toy Box Schema, Materia: Gatherer IV
. - Range 111: SC17 > SC22 > SC21 > SC20 - Dusk Leather x4, Deep Red Cluster x2, Deep Green Cluster, Deep Blue Cluster, Iron Giant Core x2, Toy Box Schema x2, Materia: Gatherer IV, Crafter IV
. - Range 111: SC16 > SC17 > SC21 > SC22 - Dusk Leather x3, Deep Red Cluster, Deep Green Cluster, Deep Blue Cluster, Far Eastern Coin, Iron Giant Core, Toy Box Schema x2, Materia: Gatherer IV x2, Crafter IV
. - Range 112: SC04 > SC10 > SC16 > SC22 - Dusk Leather, Deep Blue Cluster, Far Eastern Coin, Iron Giant Core, Magnificent Mogcrown, Fine Alumen, Materia: Gatherer III x4, Gatherer IV x2
. - Range 114: SC19 > SC20 > SC21 > SC22 - Dusk Leather x4, Deep Red Cluster, Deep Green Cluster, Deep Blue Cluster x2, Iron Giant Core x3, Toy Box Schema, Materia: Gatherer IV
. - Range 118: SC18 > SC22 > SC20 > SC19 - Dusk Leather x4, Deep Red Cluster, Deep Green Cluster, Deep Blue Cluster x2, Iron Giant Core x4, Materia: Gatherer IV
. - Range 132: SC13 > SC22 > SC17 > SC16 - Dusk Leather x2, Deep Red Cluster, Deep Blue Cluster, Far Eastern Coin, Iron Giant Core, Toy Box Schema, Fine Alumen, Materia: Gatherer IV x2, Crafter IV x2
Five-sector Quintets (select trips)
- Range 121: SC07 > SC10 > SC16 > SC17 > SC22 - Dusk Leather x2, Deep Red Cluster, Deep Blue Cluster, Deep Blue Crystal, Far Eastern Coin, Iron Giant Core, Magnificent Mogcrown, Toy Box Schema, Fine Alumen, Materia: Gatherer III x3, Crafter III x2, Gatherer IV x2, Crafter IV
Endgame Ship Designs
When designing your ships, there are two things to keep in mind: you need to have 90 or more Survey to visit the endgame sectors, and you need to have enough Range to follow the path you want to take without having too much extra (if you can still follow your desired path after downgrading your hull, then you should probably think about downgrading your hull to upgrade something else). With those two in mind, your options are naturally limited to a fairly small set of choices.
The following are some examples of ships I'd recommend for different purposes. All of the below designs will meet the minimum requirements for visiting at least two endgame sectors (90+ Survey, 70+ Range) except where otherwise stated. I feel that your hull shouldn't give you much more range than you're planning to use. In general, I favor Retrieval over Survey, as they do the same thing in two different ways (we think) but Survey is all-or-nothing while Retrieval is much more granular. This makes small variations matter less for Survey than for Retrieval. Also, we could be wrong about what Survey does or what impact it actually has on second items.
The Monster Hunter - Maximum Speed, high Survey, low Hull, minimum Retrieval (Zu Mount Farming)
This ship is designed specifically for hitting SC24 as often as possible, maximizing the chance of getting Iron Voyage Spoils (ie: Zu Mounts). Drop rates for these items are 1-2 for Optimal yields, and 1 for all other yields, so getting a "disappointing" yield is only slightly worse than an "optimal" yield. This makes the Retrieval stat nearly useless for obtaining them. Hitting just SC24 should take about 26 hours and 23 minutes. This version of the ship has a little more Range, allowing it to also hit one other sector from this list if desired: SC01 (adds 1h35), SC02 (adds 1h58), SC05 (adds 2h43), SC06 (adds 2h57), SC07 (adds 3h12), SC08 (adds 4h12), SC09 (adds 4h05).- Hull: Invincible
- Rigging: Viltgance
- Forecastle: Odyssey
- Aftcastle: Bronco
- Survey: 126
- Retrieve: 46
- Speed: 154
- Range: 60
- Favor: 122
The Monster Trainer - Near maximum Speed, high Survey, low Retrieval, minimum Hull (Zu Mount Farming)
This ship is designed specifically for hitting SC24 as often as possible, maximizing the chance of getting Iron Voyage Spoils (ie: Zu Mounts). Drop rates for these items are 1-2 for Optimal yields, and 1 for all other yields, so getting a "disappointing" yield is only slightly worse than an "optimal" yield. This makes the Retrieval stat nearly useless for obtaining them. Hitting just SC24 should take about 26 hours and 46 minutes. This version of the ship has a little more Retrieval, allowing it to obtain more items on average when you fail to get Iron Voyage Spoils. It also has very slightly less Speed and Surveillance.- Hull: Bronco
- Rigging: Viltgance
- Forecastle: Odyssey
- Aftcastle: Invincible
- Survey: 122
- Retrieve: 60
- Speed: 150
- Range: 46
- Favor: 126
The Frugal Freighter - Maximum Retrieval, high Survey, minimum Speed
This ship is ideal for FCs that want to maximize their gains from their company credits. By minimizing Speed while maximizing Survey (which we believe affects your chance at a second item) and Retrieval, you get the most bang for your buck. Just... not very often. If 84 Range doesn't do it for you, see the next ship design.- Hull: Invincible
- Rigging: Bronco
- Forecastle: Tatanora
- Aftcastle: Tatanora
- Survey: 120
- Retrieve: 140
- Speed: 50
- Range: 84
- Favor: 136
The Frugal Flier - Maximum Retrieval, moderately high Survey and Range, minimum Speed
Like the above, this ship is designed to minimize speed, which is ideal for FCs that want to maintain a positive credit balance, especially small FCs. However, this ship has 14 more range so you can hit three sectors more easily. After three, gains start dropping from the worse ship parts in other areas combined with the need to go further from your path to hit the extra sectors. (Assuming we're right that survey affects second items,) I consider Aftcastles to be better than Forecastles due to Forecastles being all-or-nothing, whereas Aftcastles have more stages of benefit and can come up twice per sector.- Hull: Enterprise
- Rigging: Bronco
- Forecastle: Odyssey
- Aftcastle: Tatanora
- Survey: 106
- Retrieve: 140
- Speed: 50
- Range: 98
- Favor: 118
The Fortune Seeker - Very high Survey, high Retrieval, low Speed
This ship is a minor variation on the idea of slowly getting lots of items. It doesn't have much Range, but it has tons of Survey and Retrieve, balancing them better than the Frugal ship designs. The ship is also not quite as slow as those.- Hull: Invincible
- Rigging: Invincible
- Forecastle: Tatanora
- Aftcastle: Odyssey
- Survey: 124
- Retrieve: 122
- Speed: 68
- Range: 80
- Favor: 136
The Treasure Hunter - High Retrieval, moderately high Survey and Range, low Speed
This ship focuses on item collection, but has enough Range to hit three sectors easily while having a speed at least a little better than "plodding."- Hull: Enterprise
- Rigging: Invincible
- Forecastle: Odyssey
- Aftcastle: Odyssey
- Survey: 110
- Retrieve: 122
- Speed: 68
- Range: 94
- Favor: 118
The Average Airship - Moderately high Retrieval, otherwise average stats
I consider this ship to be a fairly average endgame build. It has enough range to hit almost all of the doubles for farmable sectors, but only a few triples. It has pretty good retrieval while still having some speed. If this ship has enough range for you, it's likely a pretty good match. But, if you want to hit three sectors but can't hit the ones you want with only 90 range, you might want to try the next ship.- Hull: Enterprise
- Rigging: Enterprise
- Forecastle: Invincible-II
- Aftcastle: Odyssey
- Survey: 96
- Retrieve: 118
- Speed: 82
- Range: 90
- Favor: 104
The Mostly Invincible - Very average all around
If you like average ships, this ship is as close as you'll get to a ship with completely average stats. I prefer making Speed be the "dump stat" compared to Retrieval or Range because I favor Retrieval in general, and 86 range would only let you hit two sectors. If I wanted to hit two sectors, I'd use the ship design above instead.- Hull: Invincible-II
- Rigging: Enterprise
- Forecastle: Invincible-II
- Aftcastle: Invincible-II
- Survey: 100
- Retrieve: 104
- Speed: 86
- Range: 104
- Favor: 100
The Eager Explorer - Max Speed, low Range and Retrieval
If you still have sectors to unlock, you want to maximize speed so you can hit the sector as often as you can. If I am right that unlocking new sectors is not affected by any stat, then all that matters is the number of times you can visit it. Hitting only one sector feels like a waste, so you might as well hit a second one too. Assuming you want to hit an adult (17+) sector, you'll need at least 90 Survey.- Hull: Enterprise
- Rigging: Tatanora
- Forecastle: Enterprise
- Aftcastle: Enterprise
- Survey: 90
- Retrieve: 78
- Speed: 132
- Range: 78
- Favor: 90
The Enterprising Explorer - High Speed, moderate Range
If you want to hit a bunch of sectors while unlocking, you might want a bit more hull:- Hull: Invincible-II
- Rigging: Odyssey
- Forecastle: Enterprise
- Aftcastle: Enterprise
- Survey: 90
- Retrieve: 82
- Speed: 118
- Range: 96
- Favor: 86
The Trailblazer - High Range, moderately high Speed
Now, if you want enough Range to easily hit four sectors and have enough Speed that it doesn't take forever, try this one. It doesn't get as many items though, but by hitting many sectors, in theory, you have more chances to get the really rare items. This sort of design is also nice when you don't need many of an item, like when farming for some schematic mats you're missing.- Hull: Odyssey
- Rigging: Invincible-II
- Forecastle: Enterprise
- Aftcastle: Enterprise
- Survey: 90
- Retrieve: 86
- Speed: 104
- Range: 114
- Favor: 82
The Collector's Quartet - Four ships that avoid overlapping parts
I like making one of everything. I don't really like having duplicates. To that end, I was wondering if I could make a series of four endgame ships that met my requirements (enough range to hit the sectors I wanted, but not TOO much, Survey of 90 or more) that used four sets of parts that didn't overlap at all. These are the four I came up with that I really like. Three can hit three sectors (one can hit four), and the last one can hit three if those three are SC18 > SC21 > SC22.
The Frugal Freighter
(see above)- Hull: Invincible
- Rigging: Bronco
- Forecastle: Tatanora
- Aftcastle: Tatanora
- Survey: 120
- Retrieve: 140
- Speed: 50
- Range: 84
- Favor: 136
(see above)- Hull: Enterprise
- Rigging: Invincible
- Forecastle: Odyssey
- Aftcastle: Odyssey
- Survey: 110
- Retrieve: 122
- Speed: 68
- Range: 94
- Favor: 118
(see above)- Hull: Invincible-II
- Rigging: Enterprise
- Forecastle: Invincible-II
- Aftcastle: Invincible-II
- Survey: 100
- Retrieve: 104
- Speed: 86
- Range: 104
- Favor: 100
(see above)- Hull: Odyssey
- Rigging: Invincible-II
- Forecastle: Enterprise
- Aftcastle: Enterprise
- Survey: 90
- Retrieve: 86
- Speed: 104
- Range: 114
- Favor: 82
Understanding the Voyage Log
Here are some not-necessarily-obvious details about the voyage log:
Overall Ratings
The letter grade you receive appears to be based entirely on your performance in the last sector you visited. I suspect you get a letter grade for every sector, but the game only shows you the letter grade for the last one due to a UI change made late in the design process. The letter grade will almost always correspond with the per-sector rating for that last sector, but it can be bumped to the next level. It appears to get bumped up one letter grade about a third of the time. So, if your last sector is Satisfactory, you'll usually get an A, but you might get an S instead. If your last sector was Abysmal, then you'll get a C often, but you could get a B instead. The higher the rating, the less of a chance of it getting bumped, so abysmals give you Bs much more often than satisfactorys give you Ss.
Item Rarity
Sometimes, it'll call an item "High-Quality" or say that there were "Several High-Quality" items obtained. This message is not meaningful in and of itself. Items in specific categories are counted as "High-Quality" and the others are not. None of the items that are not marked "High-Quality" can ever be found HQ (I think? Has anyone ever seen HQ Dusk Leather?).
High-Quality: FC Crafting Materials, General Crafting Materials, and Unique Crafting Materials
Not High-Quality: Schematic / Special Items, Materia, Crystals
If you obtain HQ versions of an item already marked as "High-Quality," the log will state that "Several High-Quality" items were obtained. If the item is NQ, then the log will just say that "High-Quality" items were obtained.
Unlocks
When you unlock a new sector, the unlock message is placed in a confusing location within the log. If the visit that triggered the unlock was not the last sector in the trip, the message will appear after the next sector's log starts. There will be a message stating that your visit to the sector is complete, and then one that says you've set course for the next sector. After that point, the unlock message appears. If the last sector triggers the unlock, the message appears as the very last thing in the log, after the message that tells you that you've arrived home.
Unlocks only appear in the log the first time it is viewed. After that, the messages will be absent. So, even though anyone can see the previous voyage a ship went on, only the person who first saw it and took the items from the trip will see the unlocks.
There are also reports that sometimes the unlock doesn't appear anywhere in the log at all. If this occurs, it is due to a bug that was supposed to have been fixed, so please post details in the Bug category of this forum.
Wind
We are still trying to understand how Wind works. There are currently only three messages that can appear here. One mentions violent turbulence. Another mentions high winds. The third is very oddly written - it says that there was no wind, and then goes on to say that 2 surveillance levels were sufficient for exploration. We currently do not know why the message is worded this way. I feel the meaning of the message was lost in localization.
Aetherial Wheel Prototypes
If you want to send your airship out to gather the materials for specific aetherial wheels, or if you want to know which prototype to unlock first, see below for a full list.
(* = No grade III equivalent)
Aetherial Wheel Prototype II (Deep Red Crystals)- *Grade II Wheel of Confrontation (Increased exp from combat)
- Grade II Wheel of Recreation (Increased MGP gain)
- Grade II Wheel of Rivalry (Increased Wolf Mark gain)
- Grade II Wheel of Company (Increased GC Seal gain)
- Grade II Wheel of Productivity (Increased exp from gathering)
- Grade II Wheel of Industry (Increased exp from crafting)
- Grade II Wheel of Longeing (Increased choco exp)
- *Grade II Wheel of Initiation (+ stats for characters under level 49)
- Grade II Wheel of Efficiency (+ Craftsmanship)
- Grade II Wheel of Precision (+ Control)
- Grade II Wheel of Capacity (+ Gathering)
- Grade II Wheel of Observation (+ Perception)
- Grade II Wheel of Dedication (Increased spiritbond speed)
- *Grade II Wheel of Revival (Reduced weakness duration)
- Grade II Wheel of Pilgrimage (Reduced teleportation costs)
- Grade II Wheel of Nutriment (Increased food duration)
- Grade II Wheel of Permanence (Decreased durability loss)
Aetherial Wheel Prototype V (Deep Red Clusters)- Grade III Wheel of Recreation (Increased MGP gain)
- Grade III Wheel of Rivalry (Increased Wolf Mark gain)
- Grade III Wheel of Company (Increased GC Seal gain)
- Grade III Wheel of Productivity (Increased exp from gathering)
- Grade III Wheel of Industry (Increased exp from crafting)
- Grade III Wheel of Longeing (Increased choco exp)
- Grade III Wheel of Efficiency (+ Craftsmanship)
- Grade III Wheel of Precision (+ Control)
- Grade III Wheel of Capacity (+ Gathering)
- Grade III Wheel of Observation (+ Perception)
- Grade III Wheel of Dedication (Increased spiritbond speed)
- Grade III Wheel of Pilgrimage (Reduced teleportation costs)
- Grade III Wheel of Nutriment (Increased food duration)
- Grade III Wheel of Permanence (Decreased durability loss)
(39)Last edited by Nyalia; 03-12-2016 at 01:57 AM.
(The links below are sadly outdated. I hope to get around to updating things at some point.)
Desynthesis Guide: http://tinyurl.com/ffxivdesynth
Airship Guide: http://tinyurl.com/ffxivairshipguide (\v/) Airship Quick Reference: http://tinyurl.com/ffxivairshipqr
Airship Logsheet: http://tinyurl.com/ffxivairshiplog (/|\) Airship Builder Tool: http://tinyurl.com/ffxivairshipbuilder
-
07-08-2015 02:50 AM #4Player

- Join Date
- Dec 2014
- Posts
- 40
- Character
- Rhae Rhae
- World
- Lamia
- Main Class
- Gladiator Lv 51
Has anyone gotten Red or Black Clay as a reward from airship expeditions yet? I'm starting to think they dont exist..
(0)
-
07-08-2015 02:57 AM #5Player

- Join Date
- Nov 2014
- Posts
- 18
- Character
- Aronex's House
- World
- Excalibur
- Main Class
- Arcanist Lv 50
I can't confirm 100% but I was in the exact same situation you describe. I had been farming the same route day after day for optimal exp but was not finding any new sectors. I finally decided to try and change up my route to a less-efficient alternative and sure enough I discovered a new sector. I have since been under the impression that certain routes have the possibility of finding certain sectors.
Originally Posted by Nyalia
(1)
-
07-08-2015 03:03 AM #6Player

- Join Date
- Feb 2012
- Posts
- 44
- Character
- Viwi Soulz
- World
- Masamune
- Main Class
- Pugilist Lv 60
I unlock sector 4 without even have sector 3 unlock (until now still no sector 3 even tho airship already rank 5).
Originally Posted by Nyalia
(0)
-
07-08-2015 03:06 AM #7Player
- Join Date
- Jun 2014
- Location
- Gridania
- Posts
- 1,683
- Character
- Neri Feralheart
- World
- Faerie
- Main Class
- Paladin Lv 90
Originally Posted by Zerona
Do you remember the route that discovered sector 4? We did 1->3 for the longest time without finding any bamboo or new sectors. I tried 2->3 instead a couple days ago, and sure enough, we found 8 bamboo in sector 2 (OP says 1 can drop it too, but we never got it from 1 - RNG, probably). I was planning to keep doing 2->3, but if you have to do something like 2->1 or 1->2 or 2->3 (all of which are terribly inefficient for us), well, we won't find it that way. (0)(The links below are sadly outdated. I hope to get around to updating things at some point.)
Desynthesis Guide: http://tinyurl.com/ffxivdesynth
Airship Guide: http://tinyurl.com/ffxivairshipguide (\v/) Airship Quick Reference: http://tinyurl.com/ffxivairshipqr
Airship Logsheet: http://tinyurl.com/ffxivairshiplog (/|\) Airship Builder Tool: http://tinyurl.com/ffxivairshipbuilder
-
07-08-2015 03:39 AM #8Player
- Join Date
- Nov 2014
- Posts
- 18
- Character
- Aronex's House
- World
- Excalibur
- Main Class
- Arcanist Lv 50
My memory is awful but I want to say I either did 3 --> 1 or did 3 --> 2. If neither of those are options I may have simply done 3 with no other selections. I do in fact recall making a single sector flight so that very well might be the case. I need to start maintaining a captains log
Originally Posted by Nyalia
*edit*
It would actually be nice if we could gather some data on what route people chose when discovering sectors so we can see if there is a correlation. I strongly feel that there is. I will start keeping notes :P(0)Last edited by Zerona; 07-08-2015 at 03:42 AM.
-
07-08-2015 04:26 AM #9Player
- Join Date
- Feb 2012
- Posts
- 44
- Character
- Viwi Soulz
- World
- Masamune
- Main Class
- Pugilist Lv 60
I unlock sector 4 by going from 1 -> 2. As my airship currently at rank 5, this is the only route I have since sector 4 need rank 7, and i dont have sector 3 yet (rank 4).
Originally Posted by Nyalia
(0)
-
07-08-2015 04:46 AM #10Player
- Join Date
- Jun 2014
- Location
- Gridania
- Posts
- 1,683
- Character
- Neri Feralheart
- World
- Faerie
- Main Class
- Paladin Lv 90
The above two posts seem to imply that the route doesn't matter that much... Well, when/if we unlock 4, I'll post the route that did it.
(0)(The links below are sadly outdated. I hope to get around to updating things at some point.)
Desynthesis Guide: http://tinyurl.com/ffxivdesynth
Airship Guide: http://tinyurl.com/ffxivairshipguide (\v/) Airship Quick Reference: http://tinyurl.com/ffxivairshipqr
Airship Logsheet: http://tinyurl.com/ffxivairshiplog (/|\) Airship Builder Tool: http://tinyurl.com/ffxivairshipbuilder


 Reply With Quote


