

I’ll be there again this year! Can’t wait to see everyone again and the new cosplayers!
I may or may not be in the contest since I saw that they were taking submissions already a bit late, so I don’t know if I made the cut off yet. I was so indulged in working on my costume that I’ve sheltered myself from the internet for the last couple of weeks ^_^’ But either way it will still be fun to just be there!
I won’t be helping my bf this year with his costume, so all of my time is going into mine. I’m hoping he will be my assistant so I can actually get better pictures on my DSLR instead of my cellphone. I’ll share some images once I get a bit farther out, its been a time consuming project with a lot of research @_@
I did do a Machinist cosplay last year for a local anime convention. I literally made it in about 3 weeks using recycled materials from leftover cosplay projects.
https://goo.gl/photos/tLw3XfC7TSj2S5AT9
I finished it about a week after Heavensward was released, so there are still a lot of imperfections on the costume since a lot of my reference images were based on two photos and the benchmark video. Couldn’t get any good shots of the pants so I just did a skirt. I have all my in progress photos on my private fb but I’ll eventually get it on my public fb.
If they have that meet and greet event the night before the Fest I may consider bringing this costume for that night to wear. It all depends on how much room I have in the car for the drive.
-
08-11-2016 12:22 AM #11Player

- Join Date
- Jul 2013
- Posts
- 133
- Character
- Leash Sakurai
- World
- Hyperion
- Main Class
- Dragoon Lv 56
(2)Last edited by Leash; 08-11-2016 at 02:38 AM.
-
08-11-2016 12:32 AM #12Player
- Join Date
- Jul 2013
- Posts
- 133
- Character
- Leash Sakurai
- World
- Hyperion
- Main Class
- Dragoon Lv 56
For the Egi, might I suggest making it as an inflatable balloon?
 Originally Posted by Ryuko

http://makezine.com/projects/learn-p...ble-tentacles/
You’d easily be able to make it big and be able to pack it away. If you can manage to get a mini helium tank at a store in Vegas and the finished ballon is light enough, you can actually have her floating around you on a string. They also have those LED lights that you can put into balloons and you could have her glow! My recommendation is if you go this route is make at least two of them, maybe three just incase something happens.
I had originally planed on doing something like this for my Machinist cosplay but ran out of time for the convention.(1)
-
08-12-2016 09:59 AM #13Player
- Join Date
- Mar 2011
- Posts
- 1,281
- Character
- Ryuko Kanzeon
- World
- Hyperion
- Main Class
- Summoner Lv 90
That's a really good idea! A few people have suggested the 'inflatable balloon' route (including my boyfriend), but I'm really just worried about time and size. At this point, I'm still not done with my costume (probably approaching around 50%), so I really just want to do something that is a little more quick and easy. I've thought a lot about it and I think I'll be making it out of an EVA foam base with 4x stretch fabric on top. That way, I can assemble it and disassemble it without worrying about the paint chipping or something like that. The fabric is really cheap and easy to apply, too, so as I am coming down to the wire it would be something I would feel confident with. But, I'm definitely going to consider all my options once I get there!
Originally Posted by Leash
(1)
-
08-15-2016 07:48 AM #14Player

- Join Date
- Aug 2011
- Location
- Limsa Lominsa
- Posts
- 469
- Character
- Nariko Star
- World
- Sargatanas
- Main Class
- Arcanist Lv 100
>.>
Originally Posted by Leash
<.<
I don't need anything like this for my costume for fan fest...
But my soldering iron arrives tomorrow and I now have the urge to grab some plastic to try this amg. I mean... I GUESS it could always turn out to be a particular minion with the use of those little battery operated fans...

I wonder, he mentioned being limited to color, but how well would airbrush painting it would hold- or maybe too sloppy on plastic?(2)
★ ~*Love Love Star Maid Cafe Event Coordinator*~ ★
-
08-26-2016 08:49 AM #15Player
- Join Date
- Aug 2011
- Location
- Limsa Lominsa
- Posts
- 469
- Character
- Nariko Star
- World
- Sargatanas
- Main Class
- Arcanist Lv 100
This won't be what I'll be premiering for Fanfest 2016, but I do plan on bringing it and maybe wearing it if we have another pre-pool side meet up like last year!~ I may let a friend walk around in it so wanted to post show of the progress works for it! I'll be using this at Anime California so it had really been halting any work for my main cosplay for this year's fanfest- but since the hard parts out of the way I'm excited to put full focus on my Bunny Chief!
Moonfire Halter Top - Dalamud Red Process and WIPS!

Quick synopsis!
This was actually the first bodice I'd ever made, out of the 2 other costumes I had done they were spandex / lyrca skintight so doing this pattern was compeltely new to me! I took some old recycled shirts cut them up to use as reference for patterns and made adjustments from there. I did ALOT (and I mean I sewed 9+ shirts out of muslin test fabric before starting the final).
I started by going to the LA fashion district (I'm lucky to live close!) to gather everything I thought I would need. Walked away with White light-weight cotton 97%(with some synthetic mixed in for stretch) and Basic Red. I couldn't find the correct color contrast in the same material type- so I opt'ed to dye my own fabric to get just the right color mixture.


Next I did about 1 - 1 1/2 weeks of tests and research. Best methods, practicing sleeves >___> (because those things are hard!) and making small adjustments to the pattern while observing how it worked or worked against my body structure. @___@ I test ALOT. I really am not sure what I'm going to do with all the extras!


Sooooo many Bodices!

After COUNTLESS tests I finally came up with my go-to pattern and final prototype! (Included a shawl collar although I'm still skeptical if the Moonfire Halter top shirt is really just a unusable mini hood... but this was fine with me so I went with it! Also changed it to have interfacing so that I could easily flip back the fabric and not see any of the applique from the front!


Start the VERY TEDIOUS pinning, basing, and ironing! @___@ Lining all these stripes up across 4 panels.... so much measuring, folding, RE-FOLDING, and just overall so meticulous to work with ~__~


Sleeves!!!! The bane of me I swear-


Originally I had planned on doing the plus symbols out of thread... but after seeing it it just didn't do it justice decided to go with appliqueing. Because the strips were so thin, this part probably actually was the most tedious. So much difficulty trying to iron it out @__@


I left heming the end of the attire last so I could still sew in all the details without breaking through the interfacing! This way it matches the original design and the inside is all white! Used white yarn to mimic the stitches in the attire.

Needed to do some work for the leather straps on the ends of the front of the shirt... I originally bought a faux suede leather but I soon realized it was far to flimsy to work with even though I really liked the texture. So.... NEXT BEST THING - FOAM!
I used Lost Wax's foam faux leather technique to mimic a leather like pattern. It's a pretty cool tutorial with foam if you've never done it! TLDR; Take tin foil, crumple it, put it over your foam, put something over the foil and apply heat with iron. BAM Aweeeesome imprints/ grooves.


Base color with black wash vs Base color
 (3)
(3)Last edited by NarikoStar; 08-26-2016 at 09:32 AM.
-
08-26-2016 09:21 AM #16Player
- Join Date
- Aug 2011
- Location
- Limsa Lominsa
- Posts
- 469
- Character
- Nariko Star
- World
- Sargatanas
- Main Class
- Arcanist Lv 100
Compare next to the original material I bought- While I like the way my first attempt paint job was exagerated the actual leather is a little more subtle and the game's version follows this pattern. Also my color was slightly off.

Onto round two of trying to get a closer paint job for this particular leather type!


Used the original faux leather I had purchased to make cord strips to utilize along side the foam so I still have some pretty malleable ties!

The heart pendant my dear husband wanted to make for me after I told him I didn’t think I would have time and the blessed soul was all like LET ME MAKE IT! So I sketched out some blueprints, printed to size in relation to our 5mm diamond and told him basic instructions on using sculpty/wonderflex in my experience~ two days later he spit out the cute heart and metal design! I did a bit of touch up to the heart mold before baking and plan on giving it a better metallic like paint job but I think he did really well for his first time working with wonderflex! After the pieces were completed by him I took some dark red velvet I had bought and cut a strip, attached crimper fasteners along with a clasp and chain~


@___@ Onto sandals! I found a pair I liked that aesthetically matched close enough to what I believe the Moonfire Halter Sandals are- except THEY WEREN'T RED QQ~
Nothing a paint job can't fix...

First duct taped off area's I DID NOT want painted.

Went cray with painting! (Initially tested dye- NOPE that didn't work, so went with a watered down acrylic- yes it changed the texture slightly of the suede but color was much more accurate!)


And that is a majority of my WIPs for this project! I still have the suit part which I'll post later but I've luckily sewn a decent amount of swim wear and worked the most with lycra / spandex so I should be able to finish that up quickly!
As I mentioned in my other post (darn you 20 image limit!) This won't be my primer attire for 2016 Fanfest but I will be bringing my past FFXIV cosplay's with me the Moonfire Halter, Coronal Halter, and 2014's Mage Coliseum set with me to 2016 so they may appear on a friend and or appear on an off day!
Anyways Looking forward to seeing everyone! So glad this project is wrapping up so I can full-force Bunny Chief Gold Saucer fun!(4)Last edited by NarikoStar; 08-26-2016 at 09:46 AM.
-
09-14-2016 11:55 AM #17Player
- Join Date
- Aug 2011
- Location
- Limsa Lominsa
- Posts
- 469
- Character
- Nariko Star
- World
- Sargatanas
- Main Class
- Arcanist Lv 100
Looks like emails have been sent out regarding submissions to the cosplay contest! Seeing reports of both emails with confirmation of being accepted or not being accepted to the contest~ so if you sent out an email submission make sure to look for it!
Good luck all! We're a mere 30 days away from Registration! And even if your costume was not selected for the contest please still bring it to wear for fun! There are a ton of attendees cosplaying this year regardless of them entering the contest so this year's sure to be a great turn out and always nice to get lots of group photos!!!(0)
★ ~*Love Love Star Maid Cafe Event Coordinator*~ ★
-
09-15-2016 12:14 AM #18Player
- Join Date
- Jul 2013
- Posts
- 133
- Character
- Leash Sakurai
- World
- Hyperion
- Main Class
- Dragoon Lv 56
Beautiful work! The tailoring and stitching is marvelous!
Originally Posted by NarikoStar
I skipped out on Anime California Con to work on my costume, I’m sad I missed out. (0)
(0)
-
09-15-2016 12:20 AM #19Player
- Join Date
- Jul 2013
- Posts
- 133
- Character
- Leash Sakurai
- World
- Hyperion
- Main Class
- Dragoon Lv 56
I’m so relieved that I got my email confirmation. I’ve been working on this costume every single day since July.
Here’s a little sneak peek:
Made a duct-tape mannequin of myself back in July. I’m so glad I did this first as it has made it so much easier to build patterns, since a lot of pieces are form fitting.

There’s over 2,000 scales here. I still have to hand stitch them all on and possibly do some more touch up painting @_@

I’m about 80% done, but there’s still a lot of work to do. Its taking me a lot longer than a normal costume because I’m trying out and learning new things. I’m also making the costume as genuine as I can. Minus the prop, it could be used in a medieval sword fight ^o^
One month crunch count down! @_@(1)
-
10-11-2016 06:47 AM #20Player
- Join Date
- Jul 2013
- Posts
- 133
- Character
- Leash Sakurai
- World
- Hyperion
- Main Class
- Dragoon Lv 56
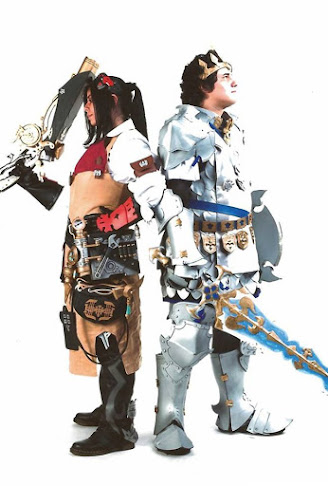
Finally finished! There’s around 2,200 scales and about 80% of the armor is made with leather. I took a few shots of it in my test run minus the gloves, I realized when putting on the whole costume that I didn’t put my hair up right and had to take them off to get the helm on right ^^’
If I’m lucky, I hope to have WIPs up soon! But for now I need to figure how I’m going to travel with all of this @_@


My friend will be cosplaying with the Stardust Rod I made for her. It will be making its first debut too ^o^
See ya all there!(2)Last edited by Leash; 10-13-2016 at 03:04 PM.
 Reply With Quote


