


Hey guys! ヾ(^∇^)
(lol need to edit the title, found out you write it with 's and not only s)
I want to present you my latest FFXIV Cosplay.
(please don't mind my poor English, I'm from Austria and no native speaker _(´□`」 ∠):_)
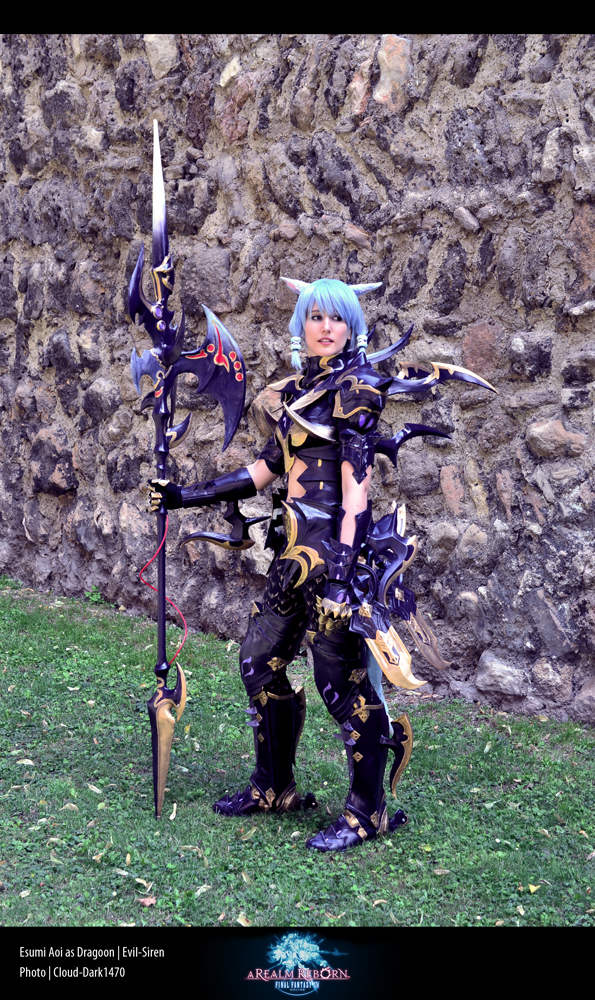
。o♡♡ It's the AF Dragoon armor. ♡♡o 。
It was a huge project and took me about 2,5 months to finish it. (Started at the middle/end of April, finished right before the end of June)
The costs are about 1000 Euros (1300 Dollars) Yea, kinda sick that I spent so much money on it but I always wanted to do it!
Half of the costs were for the special material I used --> WONDERFLEX ლ(╹◡╹ლ) wheee
It's such a brilliant thermoplastic material. I never worked with it so I really hope that my cosplay turned out nice ^^
The Dragoon armor looks so badass and it was always my dream to make an "armor" cosplay hehe. (=⌒▽⌒=)
(I wasn't sure which one would be my first armor cosplay, I also wanted to make a Mass Effect cos but oh well maybe next year ^^)
I will divide this blog into 3 different categories.
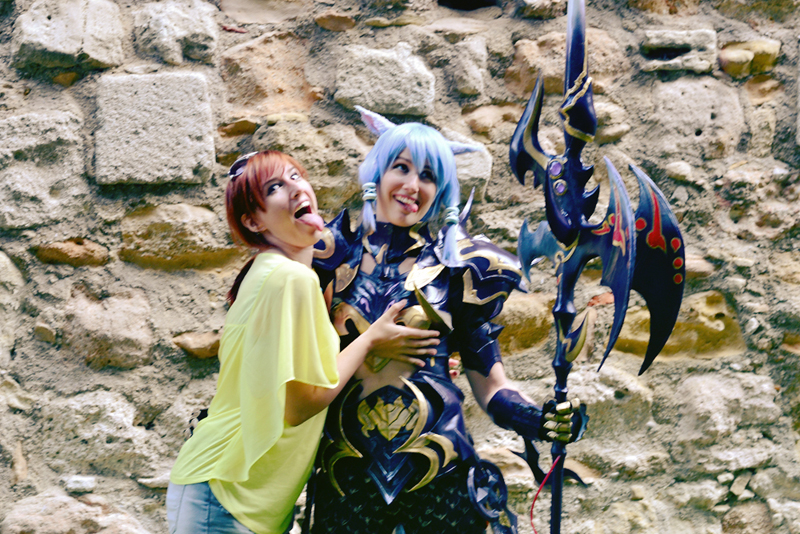
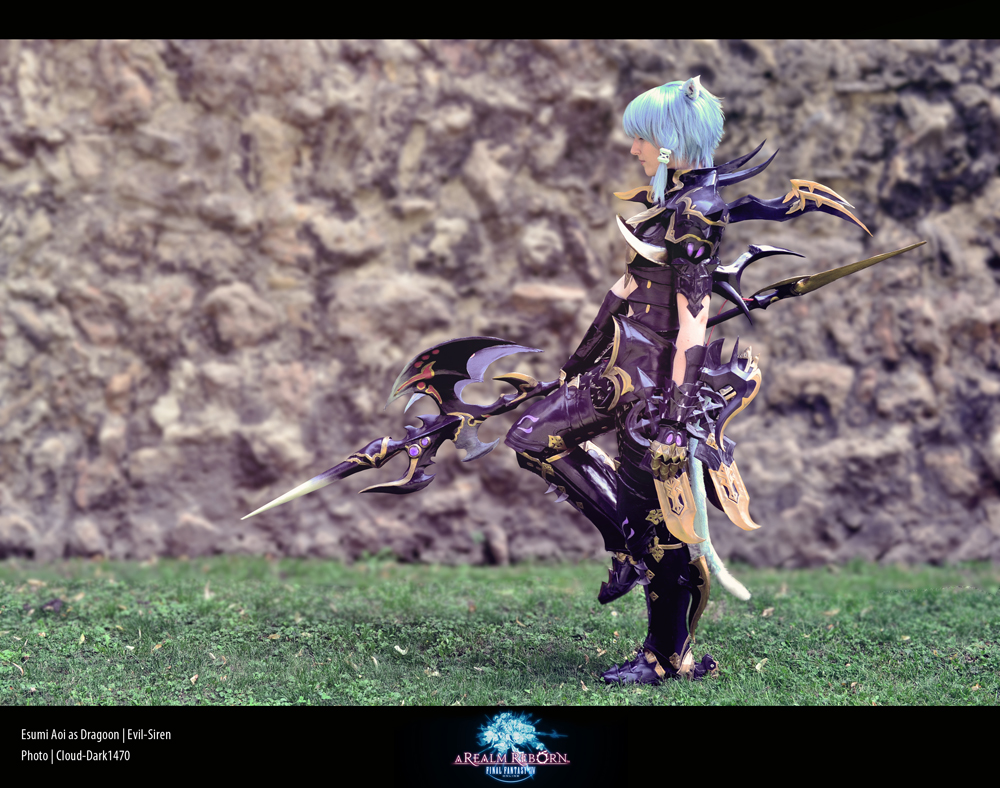
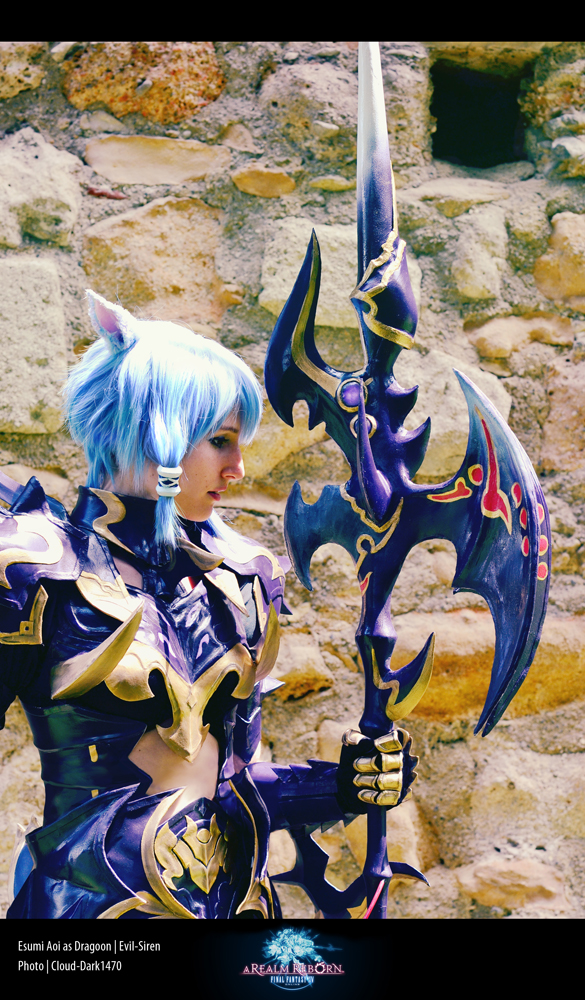
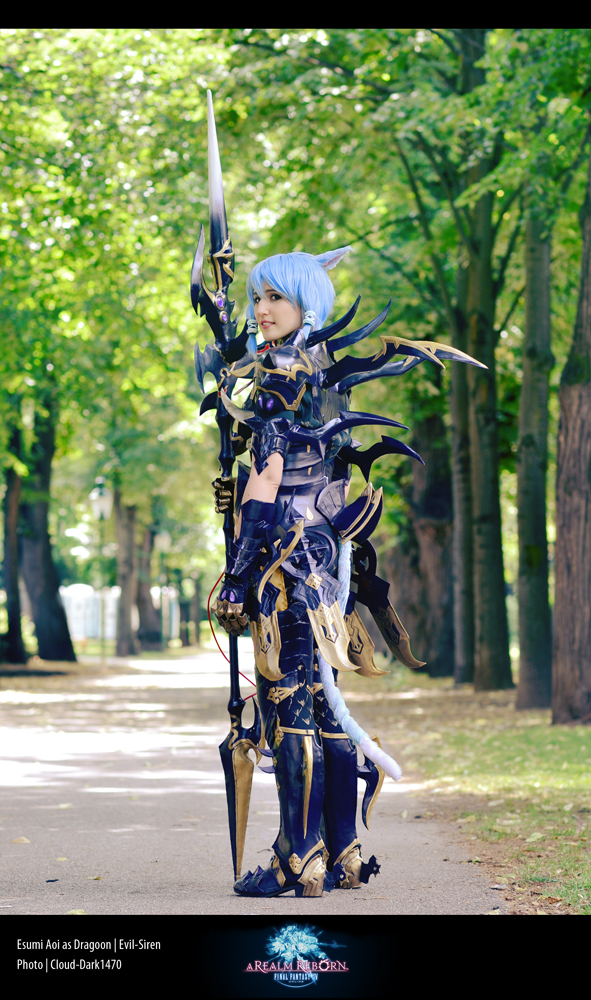
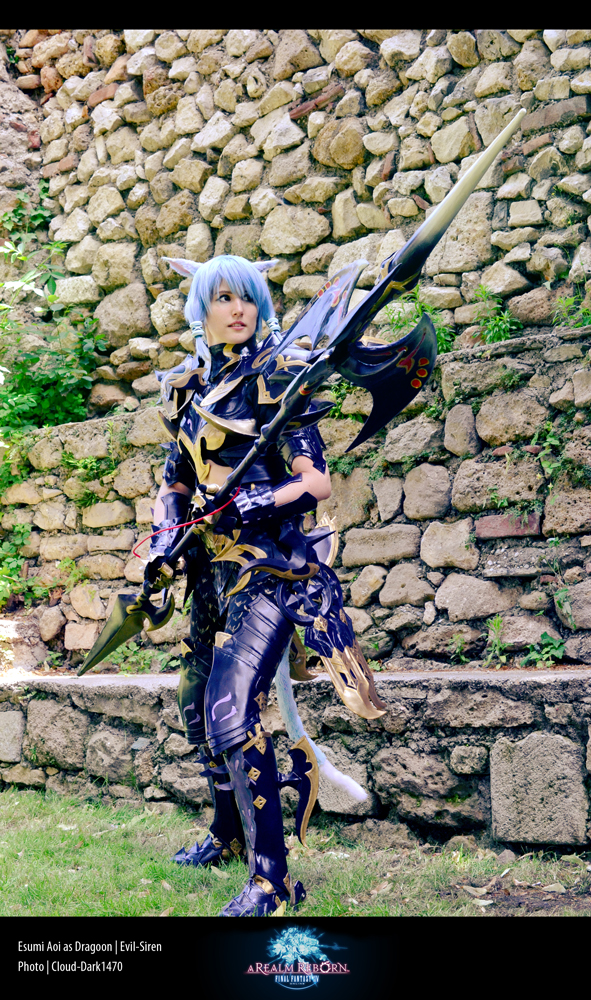
- Photos of my finished FFXIV Dragoon cosplay as my character Esumi Aoi
- Things/Materials I used to make it
- Work in Progress (WIP) with photos and some infos
Special thanks goes to:
- My boyfriend who tolerated the chaos, noise, smell I caused in our apartment over two months.
- Holy Dragoon for all your screenshots you shared with me
- Mika Azatori for the funny conversations we had while crafting (all that suffering hahaha) x'DDD
- Kamui (she doesn't know me but her tutorials are awesome!)
Super special thanks goes to:
- My beloved twinsister Cloud-Dark1470
She was my conslave the whole day! She fed me, she gave me to drink, she put my cosplay parts back into place, she fixed my hair she was just there for MEEE <33
She also made all the wonderfull photos <333
Ah btw. one day before the convention she visited me to help me with my pants. She drew the pattern i showed her on it. Without her, my pants would be unfinished, so thank you thousand times!!!!
Have fun and thanks for watching! ヽ(●⌒∇⌒●)ノ
☆☆☆☆☆☆ Photos of Esumi as a Dragoon ☆☆☆☆☆☆
If you are on deviantArt I would be very happy if you leave me a comment or a fav (=⌒▽⌒=)
-------> www.evil-siren.deviantart.com <-----
For bigger Pics you have to right-click them and open them in a new tab. <3
Typical Dragoon Pose ^^
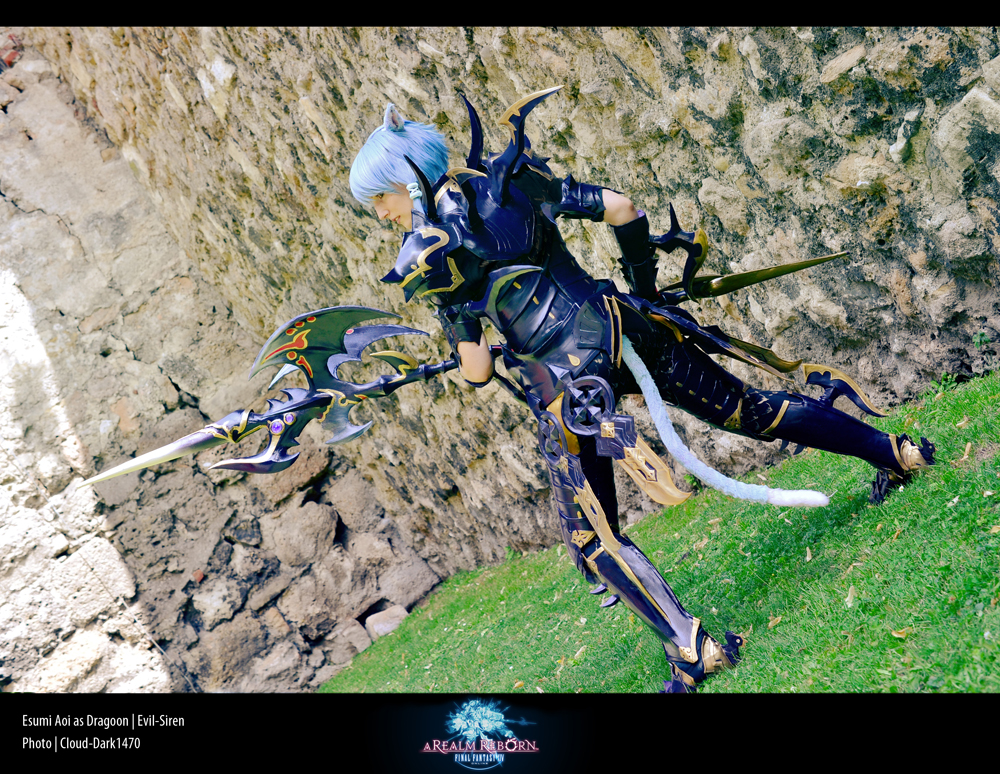
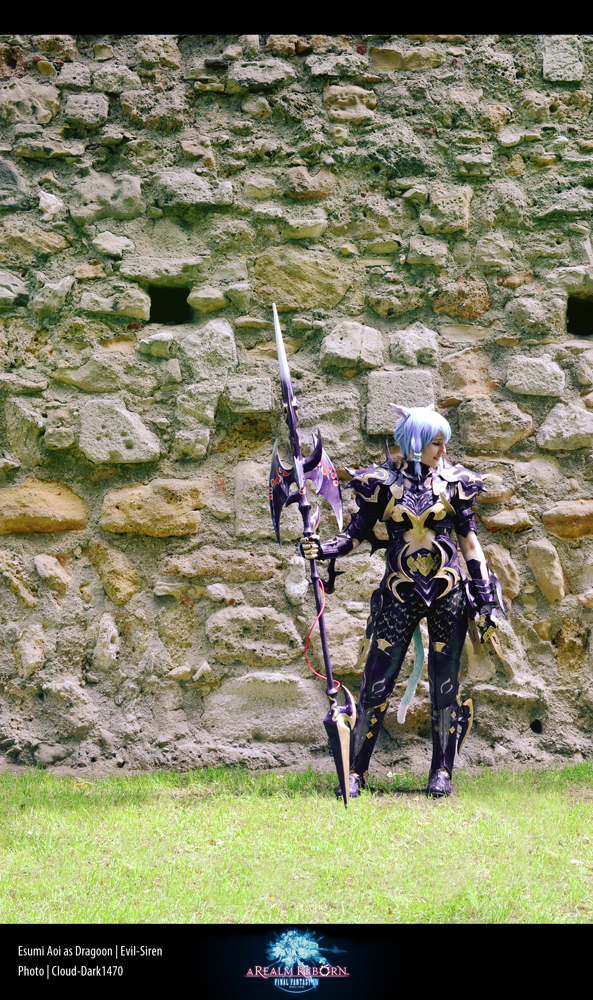
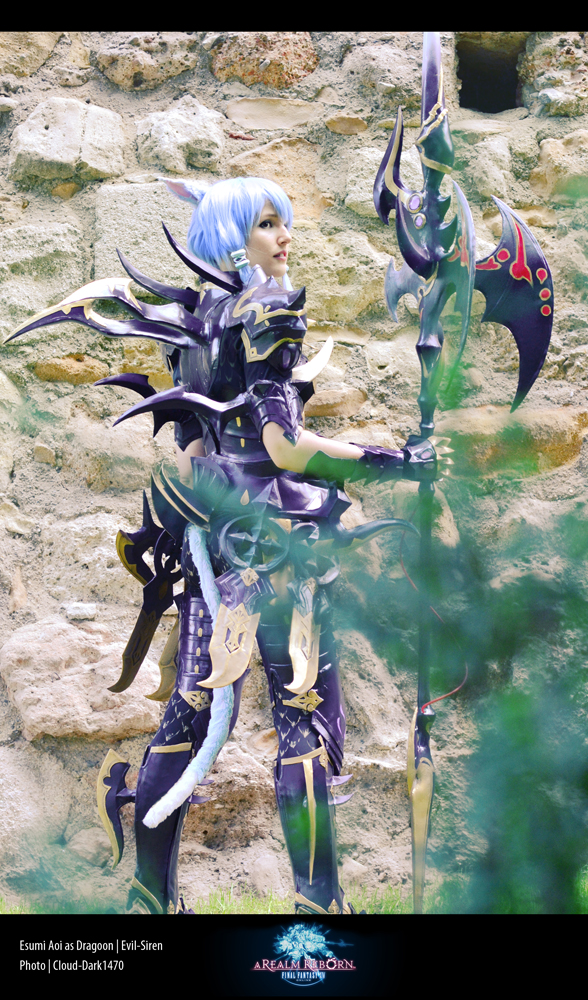
Some different poses :3
Welcome to Gridania!
I'll show you around :3
Protecting Gridania!
Is it over now? ^^
At last a little stupid Photo of my slave and me
-
07-02-2013 02:26 AM #1Player

- Join Date
- Aug 2011
- Location
- Don't care X33
- Posts
- 309
- Character
- Esumi Aoi
- World
- Excalibur
- Main Class
- Blacksmith Lv 50
☆☆ Evil Siren's FFXIV Dragoon Cosplay as Esumi Aoi :3 ☆☆
(166)Last edited by Evil-Siren; 07-04-2013 at 02:34 PM. Reason: Grammar mistake in title D:

www.evil-siren.deviantart.com
-
07-02-2013 02:27 AM #2Player
- Join Date
- Aug 2011
- Location
- Don't care X33
- Posts
- 309
- Character
- Esumi Aoi
- World
- Excalibur
- Main Class
- Blacksmith Lv 50
☆☆☆☆☆☆ For the people who are curious about the things that were needed ☆☆☆☆☆☆
The things/tools/materials I used:
(I needed to buy all of it [except for the boyfriend part ^^] that's why this cosplay was so expensive lol)
- 4 large sheets of wonderflex
- 12 medium sheets of wonderflex
- Craft foam (10 x A3 size and 20 x A4 size. Depends on the single parts)
- 2-3 kg of light white modeling clay (I needed so much for my lance ... >_>)
- 4 thin wooden sticks (lenght about 40 cm)
- A 2 meter long wooden stick for the relic lance (diameter about 4-5 cm, depends on your grip :3)
- A very large roll of brown/kraft paper (You will need it, trust me! You need to draw everything before you apply it on wonderflex. You would hate yourself if you ruin it and lots of money would go to waste.)
- Heat gun (I love that thing! I had to buy it for this project hehe)
- Scissors
- Stanley Knife
- Different kinds of sandpaper
- Rulers (for the patterns of each part)
- measuring tape (you need to know the meassurements of your body! Otherwise the patterns won't work ^^)
- Hotglue
- duct tape
- crepe tape
- clingfilm
- A super large cutting mat (60x90 cm)
- 2 litre of Gesso
- Acryl colors (different gold and silver tones/shades, black and white)
- 6 aerosol paint of the color "cassis" (brilliant and best color for the Dragoon imho)
- Nail polish in different purple tones/colors and a glittering white and blue one (you need it for the "orbs")
- Casting resin (for the orbs and cool looking shapes)
- 3 different casting resin forms/molds (every mold had about 3-8 different forms)
- Lots of different Brushes (for the color and for gesso)
- 1-2 meters of Velcro tape (to fix the parts together ^^)
- A pair of silk gloves (I lost one … dunno how so I had to buy a second pair … damnit xD)
- Shoes (I bought black stilettos/boots in a western look with only a 1 cm heel and modified most of it)
- Black cloth to make a modified turtleneck jersey xD (the belly needs to be visible and the sleeves need to be short)
- Pants to be ready for modification (I hate to sew pants so I used one I already have =P)
- Lots of time and patience
- My boyfriend who saved me from many attacks of rage "F*CK THIS S*IIIIITTTTT!!!"
ヽ(`Д´)ノ ┻━┻ - Old newspapers for the colored parts
If I missed something I'm sorry, I used so many things X3
☆☆☆☆☆☆ WORK IN PROGRESS ☆☆☆☆☆☆
So here's the story how everything started.
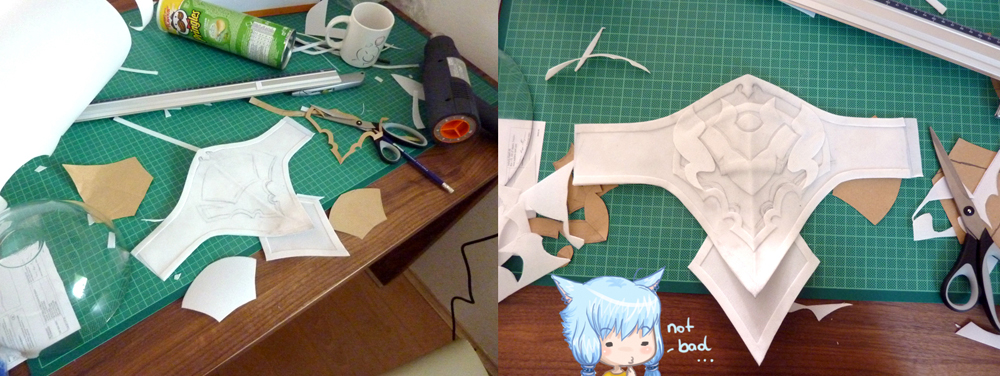
Since i never worked with wonderflex I had to start with the easiest parts. After a long time analyzing the screenshots I decided to begin with the belt.
I had to check all my screenshots to make the patterns as perfect as i could. It was much work of calculating and creating many patterns till i got the right one.
After that I apply each pattern on the smooth side of the wonderflex. (wonderflex has two different sides a smooth one and a one with a fabric grid)
For each piece i had to make a duplicate because wonderflex is really really thin (2 mm) To make it more stable you can glue 2 parts of wonderflex together.
Or use craft foam (it has to be 1-2 cm smaller then the WF pattern) and put it between the two (cut out) sheets of wonderflex (I used both possibilities, it depends on the piece)
---------------------
So back to the belt.
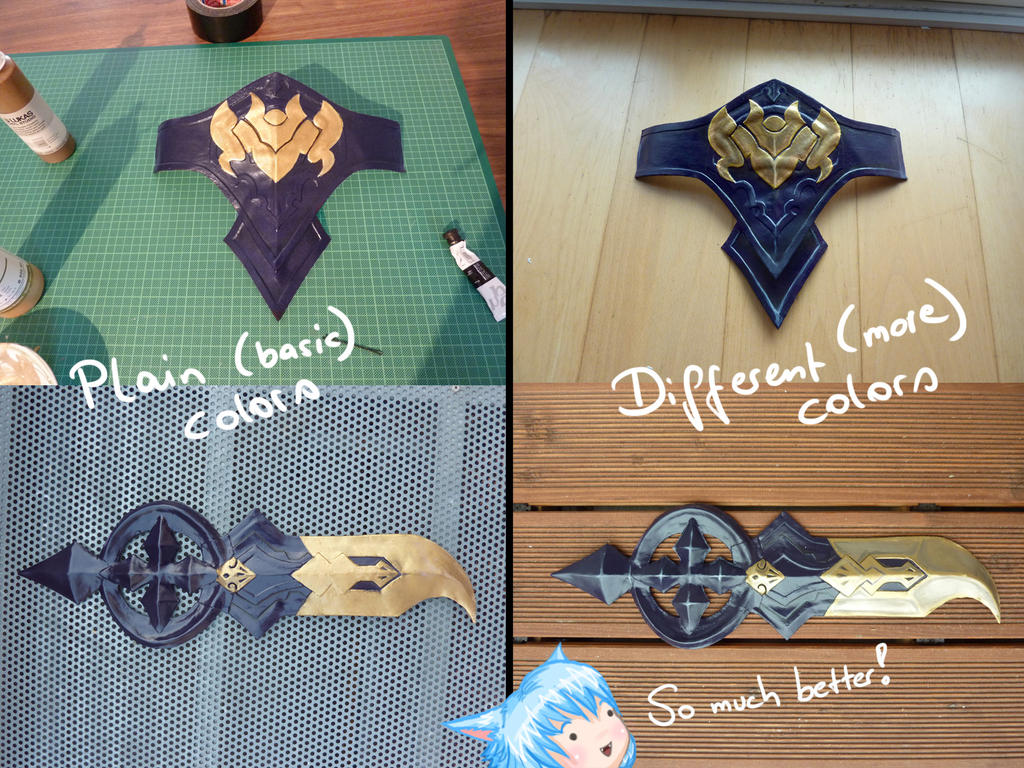
The front plate was rather easy and it was a good practice as my first piece (no craft foam for this one). For the details I also used WF. Just heat it up and press it on the right spot. The parts will stick together perfectly ^^
---------------------
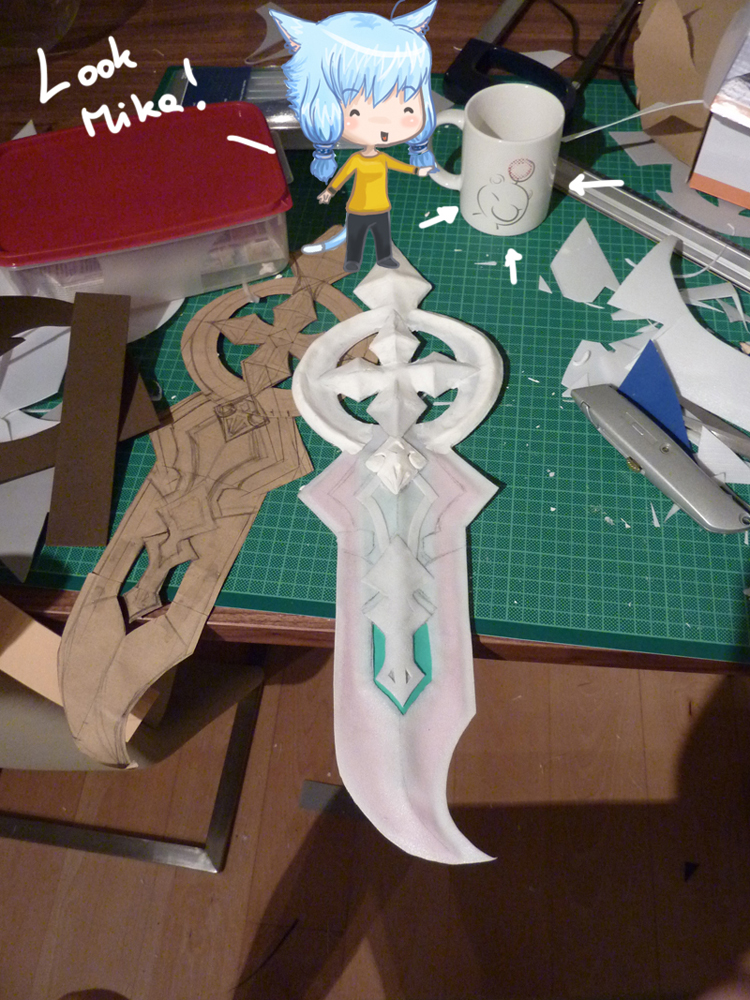
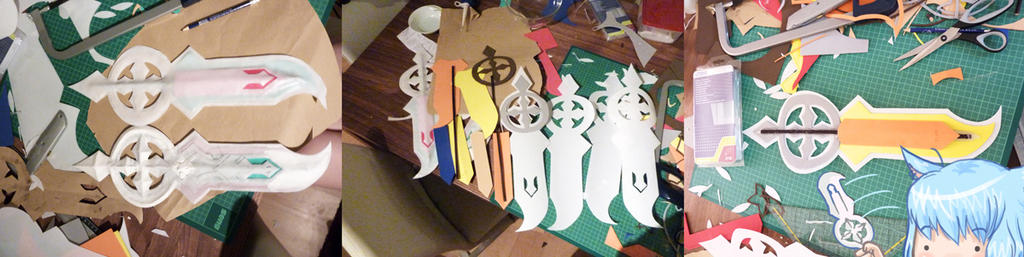
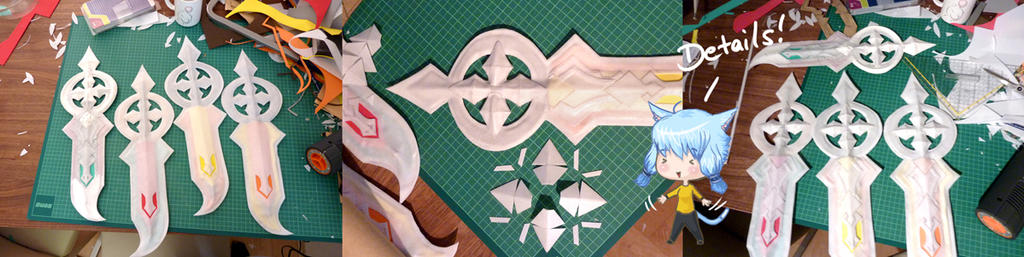
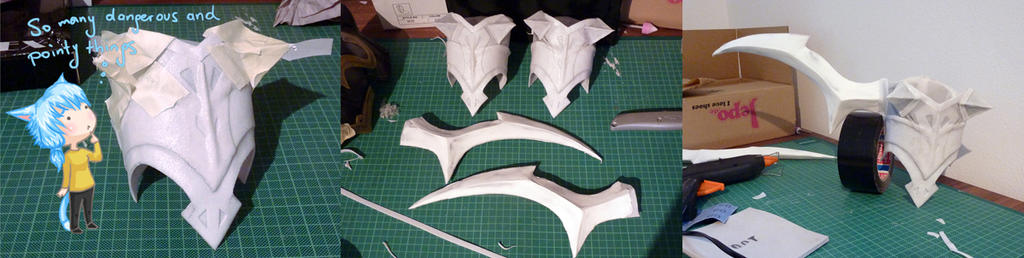
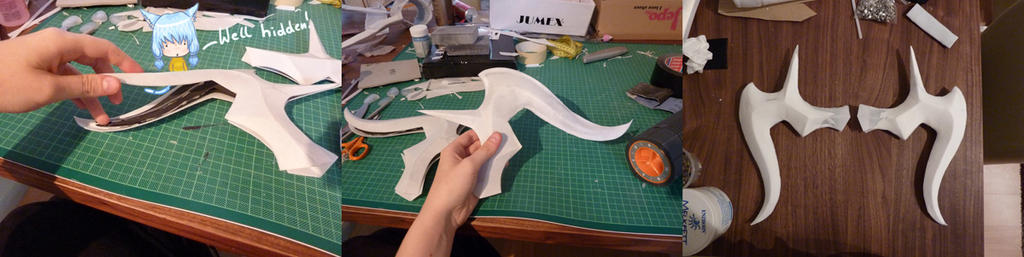
Time for the sword things. X3
Phew they were a lot of work. I had to calculate everything and fortunately my boyfriend had dividers for me @_@
When I finished my pattern I could finally start with the wonderflex and the craft foam. (the craft foam needs to be 1-2 cm smaller than the original pattern. otherwise you can't stick the WF together ^^) With the wooden stick I gave the whole construct more stabilization. For a better result I used some of the light modeling clay to smoothen the surface on some parts (like the tip of the sword). The rest (like the details) will be self-explaining by the photos =P
I had to do everything 4 times …. That sucked so much (>__<) The last part was that strange tail thing on the back. There's not much to say about it. It has a pretty simple shape, so no problem for me.
---------------------
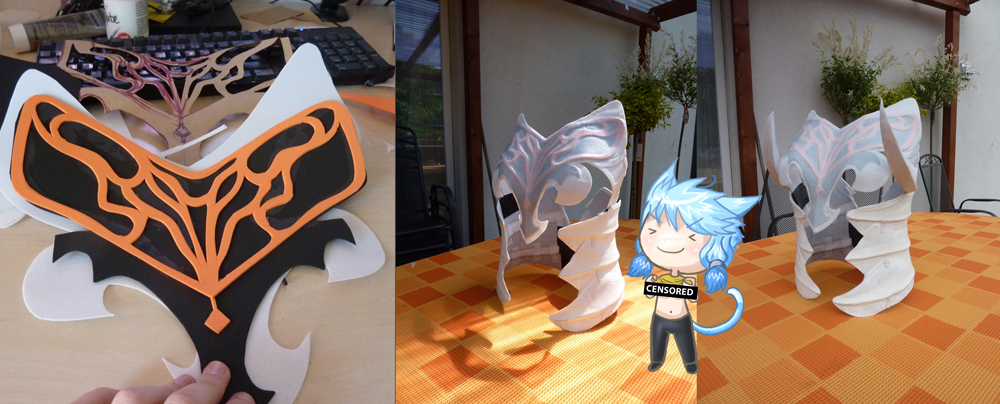
When I started the belt I didn't know it would work out like I imagined. (horray for creativity and imagination) I had to bend it on some places to get the right shape. (it was kinda horrible with the craft foam in the middle but the result was fine. (at least from the outside hahaha)
It looked like that (see photo) when it was done :3 After the WF hardened again I added the details as well as that back tail thing and set it aside.
---------------------
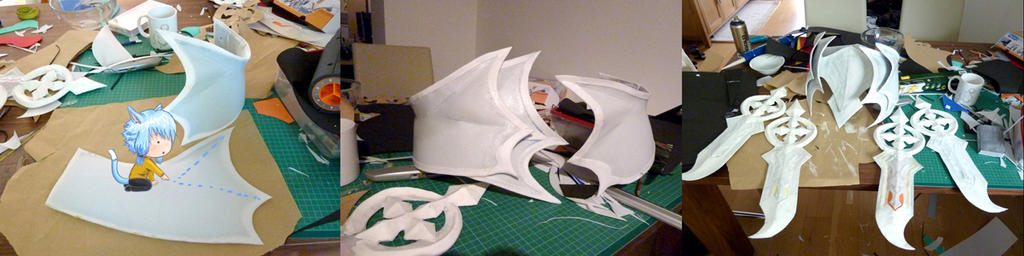
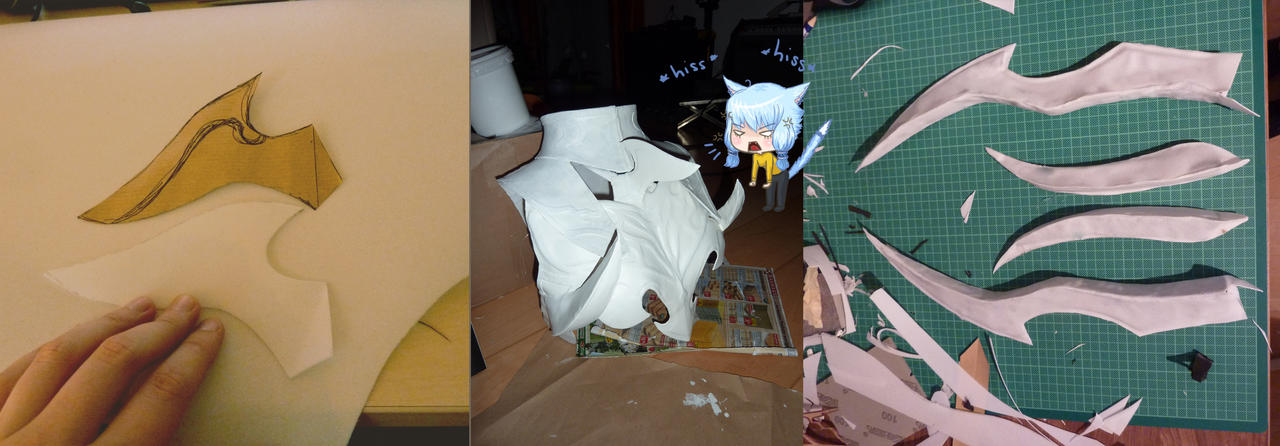
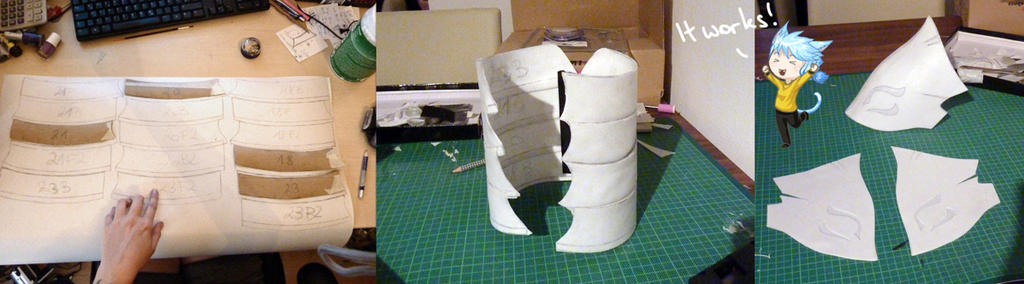
The next part was the body.
Holy s*it… I didn't knew how to make the pattern but fortunately I found a funny video tutorial from Kamui where she wraps herself in clingfilm and uses crepe tape to fix it. After that she drew the pattern on it and cut everything out xD So I used the same method. Wrapped myself in clingfilm + crepe tape and sogot my super awesome patterns for this cosplay hahaha ^^

---------------------
The Torso was the same process as for the belt, duplicate everything craft foam in the middle, hot air to stick it together and the details when it was done.
For the body part I also used light modeling clay. ( I wish my English was better to describe why…my lack of vocabulary is horrible… *cries*)
Each part overlaps the next one and there is a small raise where they overlap. This raise? (So sorry I'm not sure if it's the correct word) was created with the clay.
---------------------
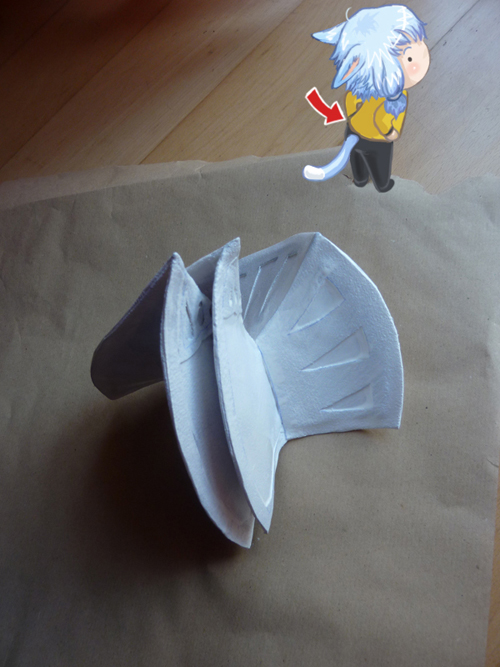
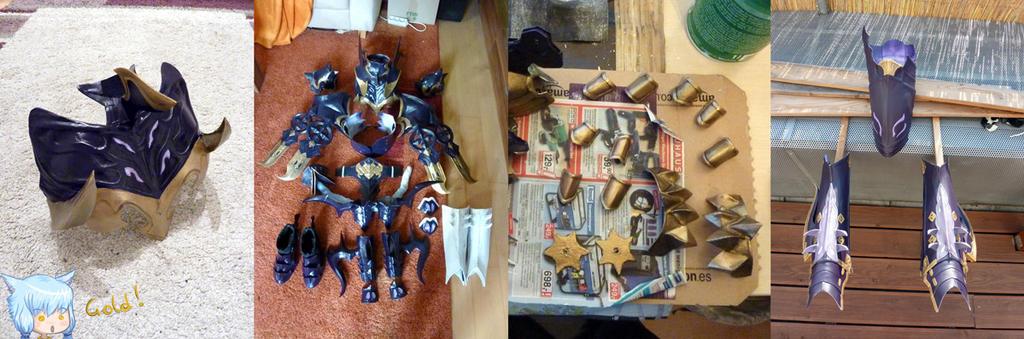
Booooobs
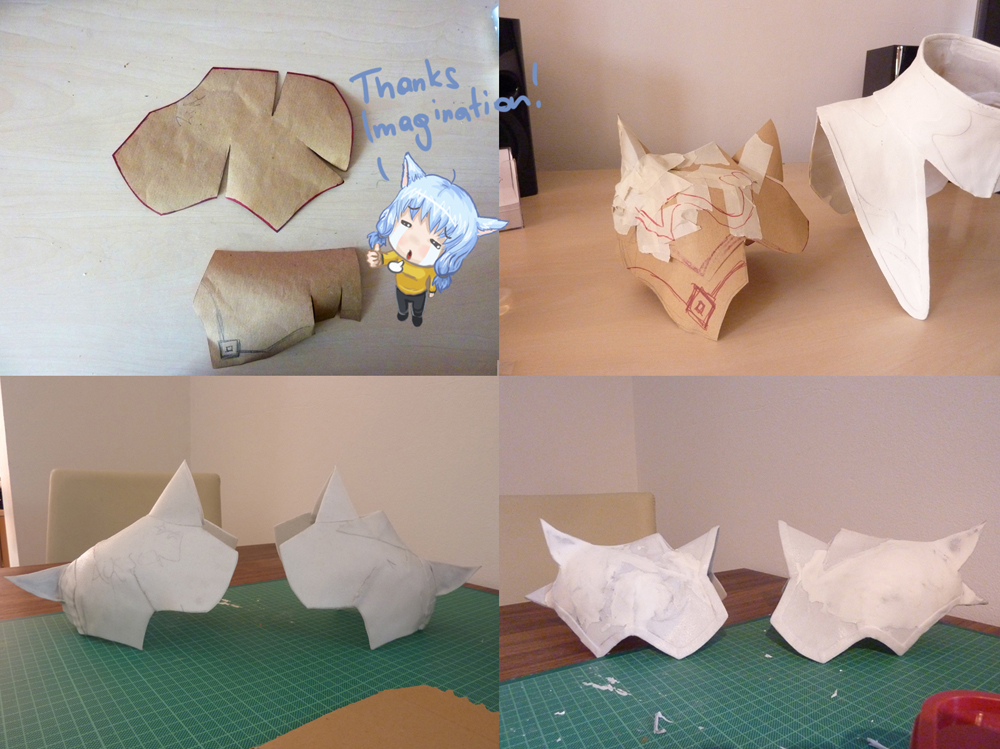
Ya now we come to the breast plate. This was kinda fun. The pattern was pretty easy but I needed to form it on my body ^^
I had to heat it up (not too hot or you will burn yourself!) and put it on my chest with pressure so it got the right shape. (This process took several times xD)
The spikes/horns on the sides were a challenge. A substructure of craft foam was needed for stabilization. It was so much work with the hot glue and I burned my fingers way too often >_> (so much rage on that day! Thank you Kyu (bf) for calming me down!) ╭(๑¯д¯๑)╮
I was super happy when everything was done.
 (63)
(63)Last edited by Evil-Siren; 07-02-2013 at 03:07 AM.
www.evil-siren.deviantart.com
-
07-02-2013 02:28 AM #3Player
- Join Date
- Aug 2011
- Location
- Don't care X33
- Posts
- 309
- Character
- Esumi Aoi
- World
- Excalibur
- Main Class
- Blacksmith Lv 50
Next was the part of the back/Neck/front piece…
I HATED IT!!! I was so damn frustrated when I started to make the pattern!! I also hate it to make collars for fabric cosplays. They never turn out as I want them to be and they are never symetrical when they have to!! ヽ(o`皿′o)ノ FUUUUUUU
After 5 Collar patterns I finally found one that would suit and fit together with the back part and the front part. Thank the Twelve it worked. For the back plate I needed Kyus help. He had to press it agains my back so it got the right shape. (like with the breast plate … I bet Kyu would have liked that more hehehe…. ^^)
Now to the spikes/pointy things! Wohooo that was hell of work. I needed a substructure like for the spikes/horns of the breast plate…… I met my enemy the hot glue again.
Curse you!! ヽ(o`皿′o)ノ
I accidentially used too much heat when I stuck everything together. This way the WF lost some of its evenness. (do you say it that way? xD) So it was time for the lovely light modeling clay to smoothen everything that wasn't even. When the clay dried up I added the details.
Time to fix the Spikes onto the back/neck/chest part. (I'm really not sure how to call it lol, if you have a clue share your thoughts with me xD)
Phew I didn't know where to start and it was more of a fight with my hands, arms, legs, and the back/neck/chest part @_@
I didn't know how to hold that damn thing to stick the spikes on the back and neck area x'DDD
Kyu was playing Warframe or another online shooter, so he couldn't help lol.
Somehow I managed it and prettified the "stuck-together-area" (lol please help me with my vocabulary x'D) with the light modeling clay.
(this clay is so awesome, it's super light and gets even lighter once it dried.
Btw. I was always afraid that the spikes would put my eyes out if I didn't pay attention.
Σ(-`Д´-ノ;)ノ
---------------------
The shoulder parts came next.
I had a pretty good day and the idea how I could make the pattern for it suddenly appeared in my mind. ^^
So I started to paint them on my brown paper and cut it out. I used the crepe tape to test it out et voilà it worked!
For the shoulder parts I used two layers of wonderflex (without the craft foam) so I could bend it much better.
Once the wonderflex harened I applied the modeling clay to erase smaller dents. After that I added the details and moved to the next part.
---------------------
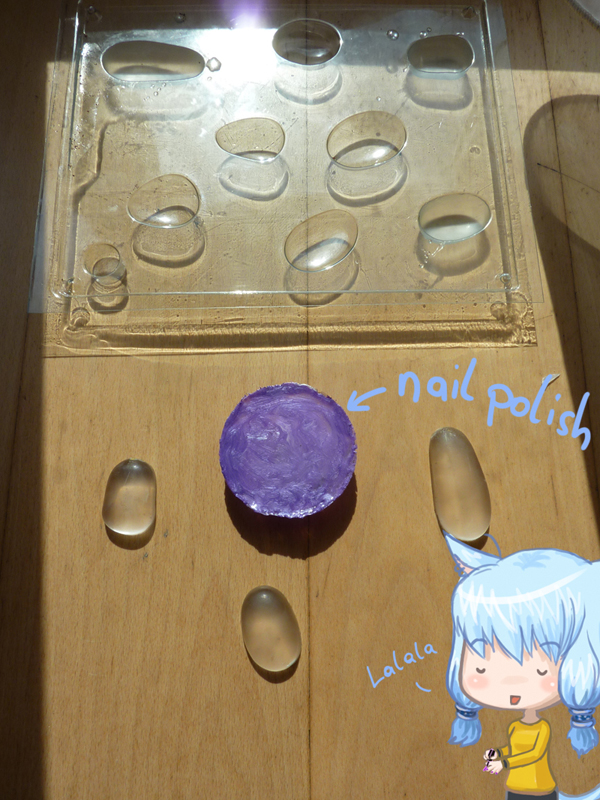
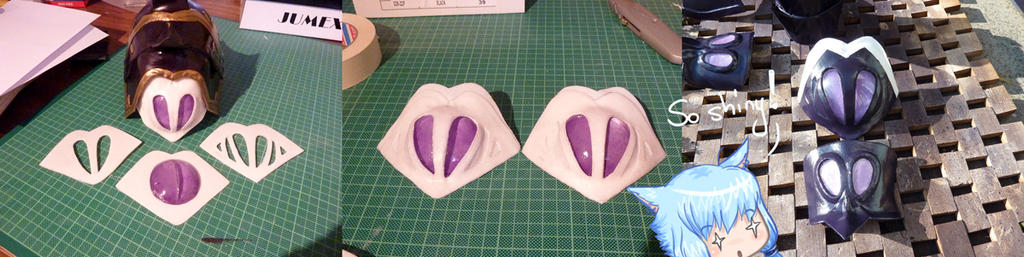
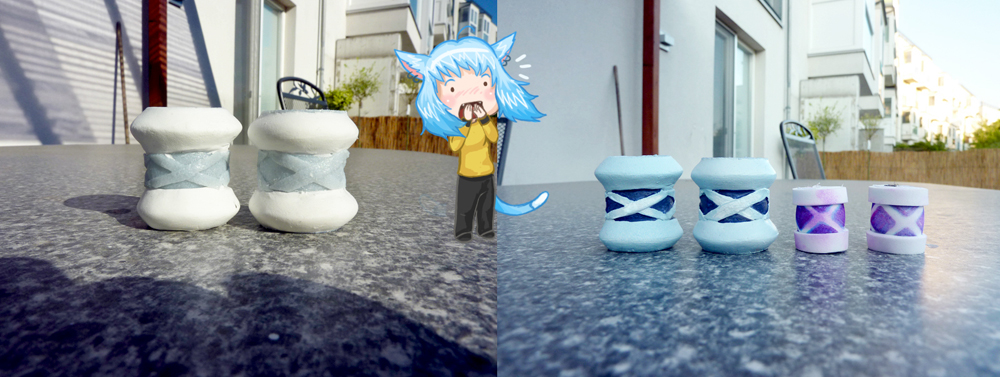
Oh such pretty and shiny ORBS!!
Time for the casting resin! Oh man that stuff smells!!!! That day the wind outside was super strong and I really had problems working outside, so I had to work part inside the apartment and part outside on our terrace. The molds always tried to fly away and my cup with the mixed casting resin and the hardener nearly fell over @_@
Somehow I managed to fill the molds with the resign and put it to a safe place on our terrace.
For the cosplay I had to create two bigger orbs for the shoulder parts. And 4 smaller ones for the gloves. (the gloves will be the next topic.
Once the resign dried I pulled it out of its molds and started to paint the back with different nail polish. (purple, white, rose, light blue)
Kamui made a tutorial about Orbs, her tutorial helped me a lot with this topic ^^ (I never worked with casting resin)
---------------------
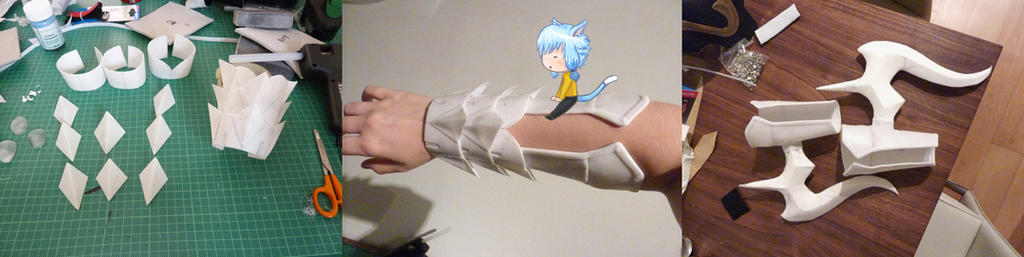
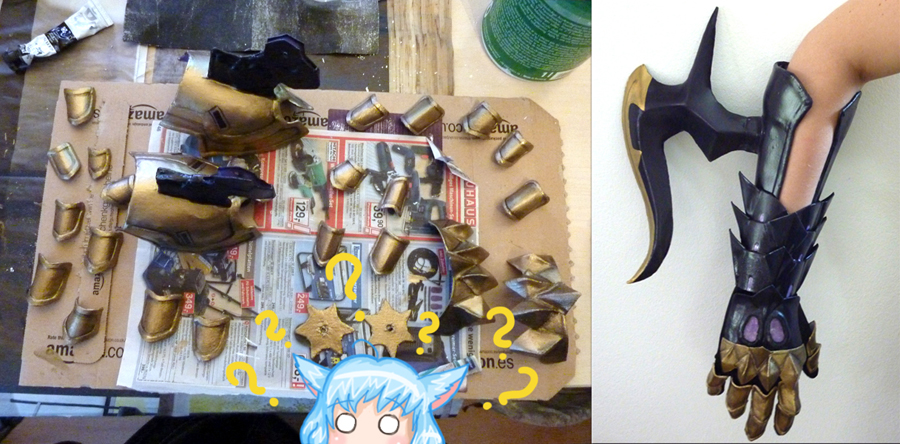
Next thing were the arm parts.
Woa more dangerous pointy things and hot glue action! Theres not much to say about it. By now you know how I work.
1.create a Pattern 2. Apply to wonderflex and craft foam then cut it out 3. Use the heat gun to stick everything together/Use hot glue for whatever it's needed 4. Details/light modeling clay :3 The only annoying part was to stick the spike to the arm part ^^ (like always)
The wrist armor was pretty easy and fast to create. I'll just show you some WIP photos cuz there's not much about to say. ^^
---------------------
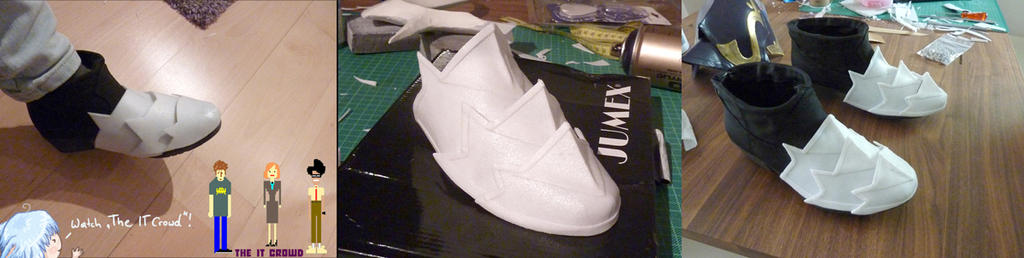
THE SHOES!!!
You have to watch IT Crowd to understand the joke behind this sentence ^^ ---> http://youtu.be/N8Y1q9RqBfc?t=34s
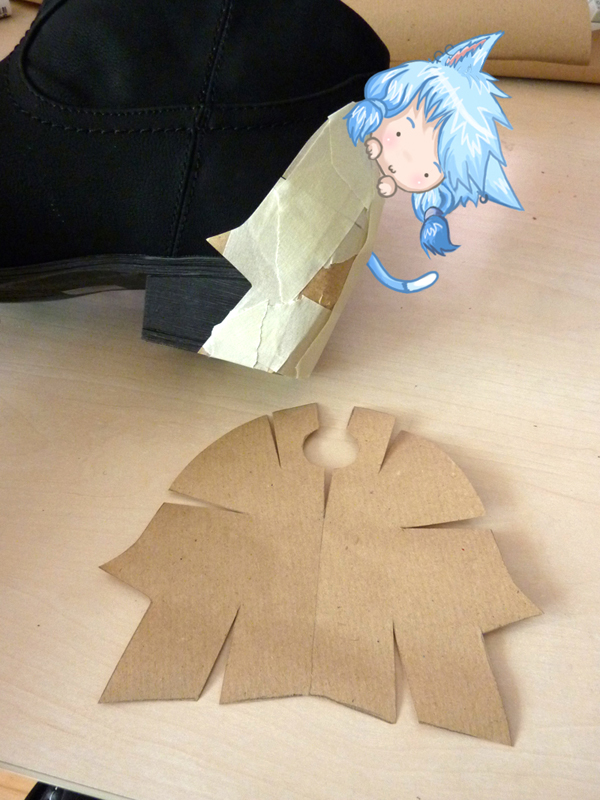
First of all I had to modify and whipstitch the boots, then I could start to make the patterns for it. This time the patterns were pretty much fun to make.
I could wrap the paper over the shoe and paint my patterns on it. The rest was pretty easy. The only thing I didn't like to do was the star on the heel >_>
Bah I had to draw that sh*t 3 times till I got it right. Btw. the wonderflex sticks very well on the fake leather ^^ (but it didn't work with the silk of the gloves … I had to hot glue them >_>)
---------------------
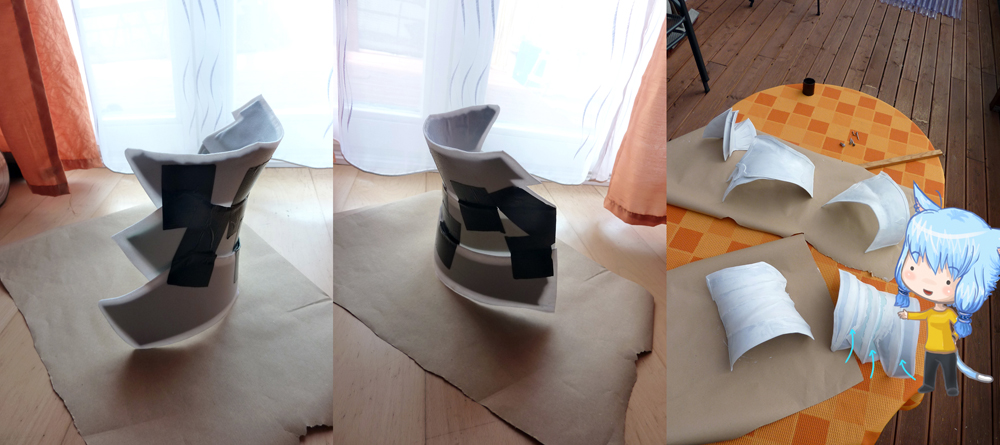
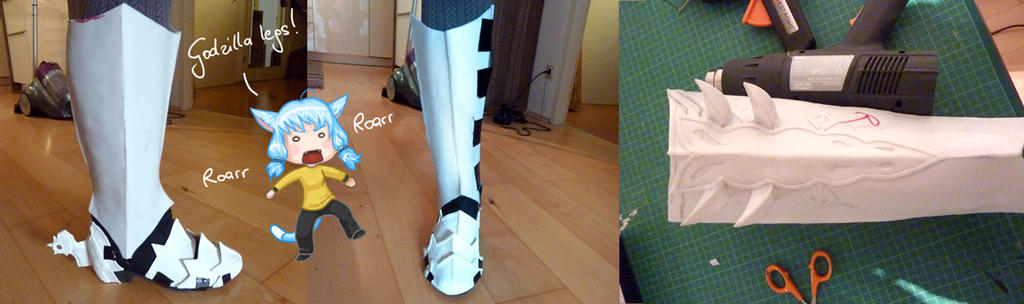
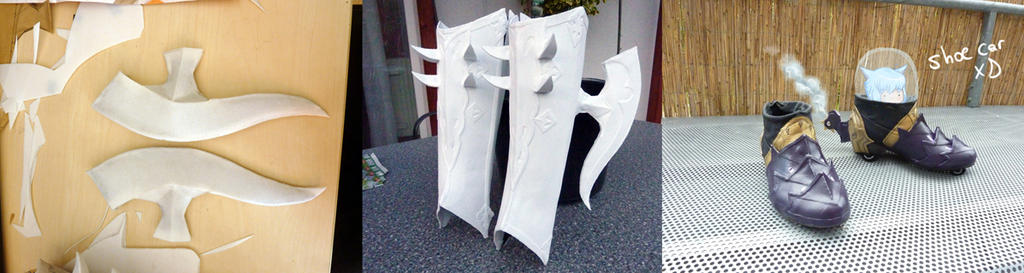
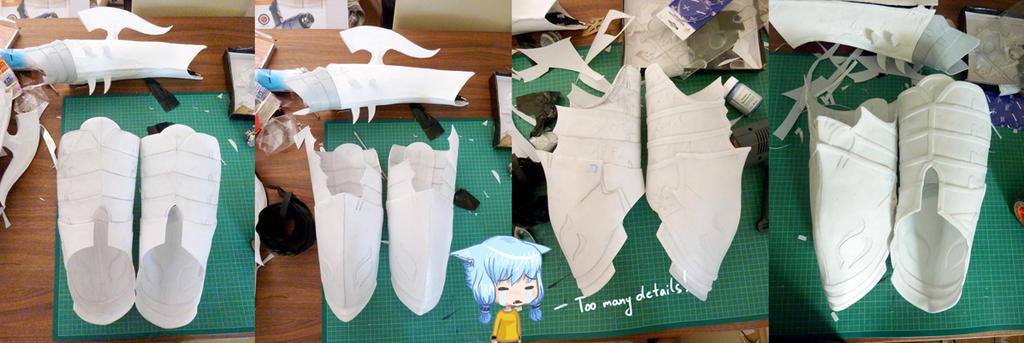
The leg parts were kinda horrible.
I have pretty thick legs… (guess I have them from my grandmother) so the boots needed the right shape to fit with my leg shape.
In Austria we would say I have legs like a potato masher. Not sure how you would express that in English =PPP
On the photos you will see the two different shapes. You need 8 of each for two legs. (remember I need to duplicate everything to have two layers of wonderflex)
The rest was just some heat gun action and put the parts together. The inner side of the boot needs to be open. It's the part where I added the Velcro tape to open and close the boots. The details were the best part of it. Except for the thing on the back of the lower leg. This thing was a desaster but I managed it somehow. (its shape is super weird)

---------------------
Next part the Gloves
I'll just post some Photos again, cuz these parts aren't very spectacular xD
---------------------
Finally the last parts of the armor.
The thighs and the knee part. (; ̄Д ̄)
So many parts for it. (like the torso) First thing was to take measurements of my upper legs to the knee. I recognized my thighs are kinda chubby (ノ)´∀`(ヾ) haha
*blush blush* Oh well back to topic. It was the same process as for the other parts, so I will post just some pics of it. ^^
The knee armor turned out better than expected. When everything was done I added some fabric to wear the upper part like garter belts. (sexy!) o (◡‿◡✿)
---------------------
The hair accessoires
This was a spontanious decicion i made. I thought the old hair accessoires were too old (too small) and not that good looking so I decided to remake them.
---------------------
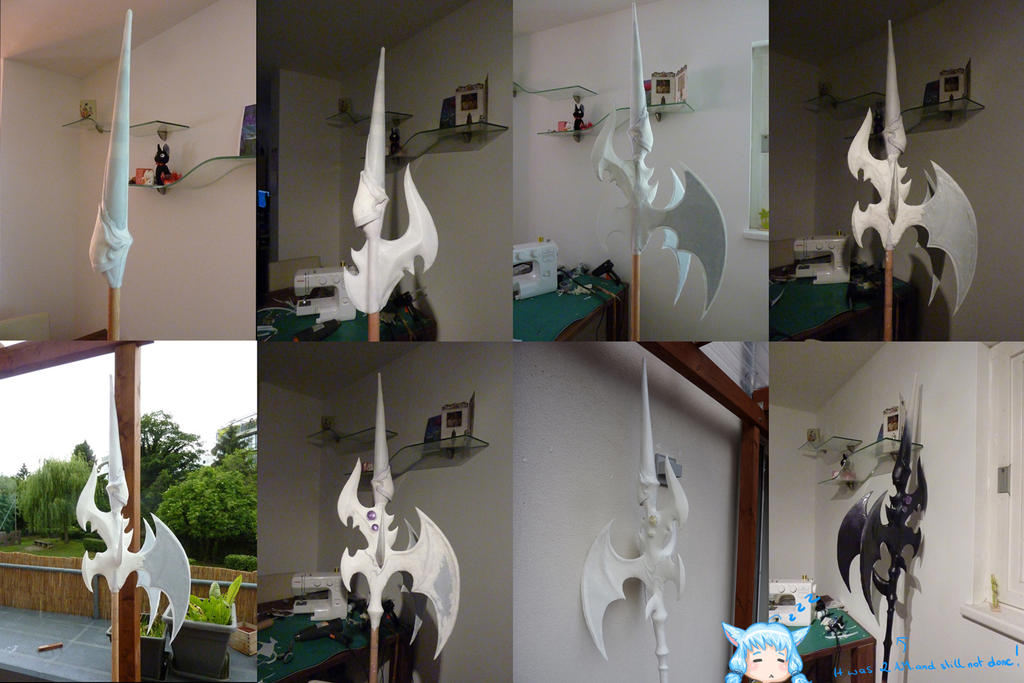
The Gae Bolg (lance)
The relic weapon was the last part I wanted to to... and it was awefull. I only had 4 days left till the convention started @_@ Kyu had to hold my lance during some parts (especialy when I fixed the wings to the staff) ... I really need Nico Robins ability to grow arms at will xD
So I spent every evening till night with it. When I nearly finished the wings my lance fell on the floor and all the clay broke down. (that was 2 days before the convention)
I really thought fuuuu, I can never make it in time. ヽ (o`皿′o)ノ I had to start all over again on the wings and wohooo they turned out even better than before! so i was kinda happy that this accident happened xD
On the last day (friday) the lance was still not ready. most of the details were missing and also the whole part on the other end of the lance. It was the longest cosplay making session of my life....
I worked till 2 am in the morning (saturday) to finish this stupid lance. I was so in panic mode that it motivated me that much to finish it, but ... it was still unfinished!!! ╭(๑¯д¯๑)╮
The lance still needed some transparent spray to cover it from damage the lance needed that red curvy thing and the other end of the lance was still without color ...
After 5.5 hours of sleep I had to get up to finish the last parts. at 7.30 in the morning. D:
2 hours later my sister and best friend arrived and we went to the convention... god what a day xD
Lol you can even see the 4 days on the pictures ^^ (the light photo from the afternoon and the darker photo from the night)
---------------------
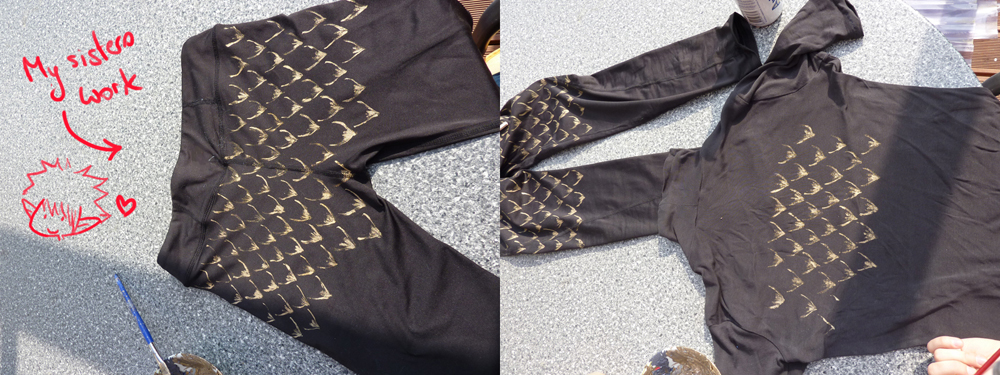
To the clothes.
I made a modified turtleneck jersey (at the beginning) and ordered my sister to my place. She had to paint the scales on it and also on the pants xD. (where they are visible)
To give them a nice effect I used some gold/silver/black color on the tips and showed my sister how to draw them. (I already had the pants, cuz I don't like to sew them…)
 (46)
(46)Last edited by Evil-Siren; 07-02-2013 at 03:40 AM.
www.evil-siren.deviantart.com
-
07-02-2013 02:29 AM #4Player
- Join Date
- Aug 2011
- Location
- Don't care X33
- Posts
- 309
- Character
- Esumi Aoi
- World
- Excalibur
- Main Class
- Blacksmith Lv 50
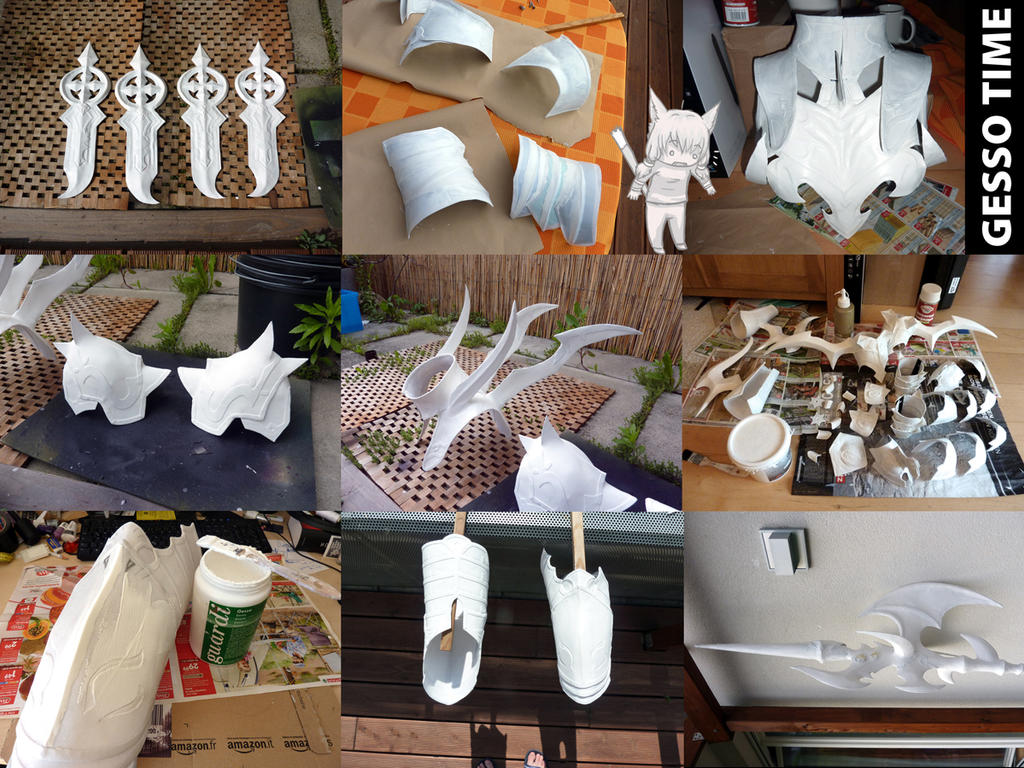
☆☆☆☆☆☆ GESSO AND PAINTING TIME ☆☆☆☆☆☆
Every time when I finished a part, I used Gesso to smoothen the surface. Wonderflex has a structure which doesn't look that good for my Dragoon Cosplay.
If you apply many layers of Gesso, the surface gets smoother and smoother. You get the best result when you sandpaper the whole thing.
Kamui also made a tutorial about painting the armor (and using Gesso ^^) it's super interesting.
---------------------
Once that is done I take the super awesome aerosol paint of the color "cassis". (I tried to spare the parts where I don't need it)
(and ya .. that situation i drew really happaned. xD not with that much color but some of it.... ^^)
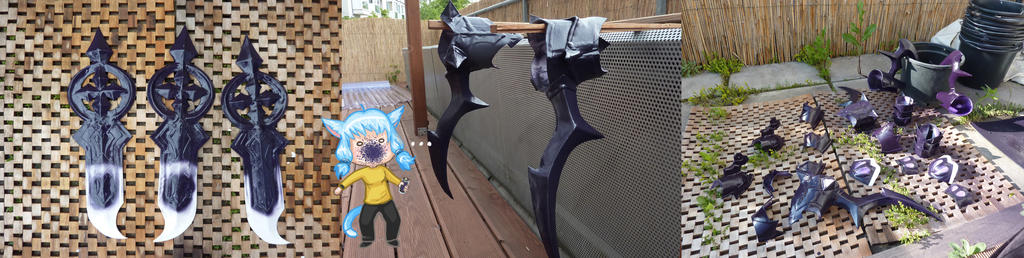
---------------------
Next thing the gold color!
It's very important not to use just the same gold color for everything. It would look boring.
I mixed different gold tones also with black and silver to get the best result
That's it!
Thanks for watching!!! ヽ(*⌒∇⌒*)ノ(73)Last edited by Evil-Siren; 07-02-2013 at 03:41 AM.
www.evil-siren.deviantart.com
-
07-02-2013 02:34 AM #5Player

- Join Date
- Jun 2011
- Location
- The Inn Room
- Posts
- 1,498
- Character
- Denmo Mcstronghuge
- World
- Excalibur
- Main Class
- Thaumaturge Lv 100
so frikkin' good. You deserve mad props for this.
(18)
-
07-02-2013 02:35 AM #6Player

- Join Date
- Apr 2012
- Location
- Ul'dah
- Posts
- 45
- Character
- Laevetine Gransbal
- World
- Balmung
- Main Class
- Gladiator Lv 60
Wow very very good job! Amazing work.
(6)
-
07-02-2013 02:36 AM #7Player

- Join Date
- May 2011
- Location
- Limsa Lominsa
- Posts
- 2,019
- Character
- Coris Teijan
- World
- Ragnarok
- Main Class
- Thaumaturge Lv 73
I...I have just a few words for this...
It's just... awesome @.@ *dies*
It looks pretty good, detailed and that Gae Bolg! Damn!
Side note:
Ich habe es einfach mal meiner Ma gezeigt und sie sagte nur: Eieieiei! (was natürlich positiv gemeint ist xD)
P.S.:
The chibis on the WiP pictures are just too cute xD(6)
Boxed Turtle Collector | Black Ravyn | Crow | Art by Sa'niquel Amrita
"You've cheated death too many times. Greed may do your bidding, but death serves no man." - Six of Crows
-
07-02-2013 02:44 AM #8Player

- Join Date
- Oct 2011
- Location
- California
- Posts
- 516
- Character
- Goufunaki Rammstein
- World
- Excalibur
- Main Class
- Marauder Lv 50
Wow!
That's really impressive! Good job! (3)
(3)
-
07-02-2013 03:03 AM #9Player

- Join Date
- Jun 2011
- Location
- Gridania
- Posts
- 809
- Character
- Vergiliaux Renata
- World
- Excalibur
- Main Class
- Arcanist Lv 80
You're amazing, Esumi.
(4)My Artwork:
GrumpyScholar @ Tumblr

-
07-02-2013 03:08 AM #10Player

- Join Date
- Apr 2012
- Location
- Gridania
- Posts
- 35
- Character
- Galuizu Crescent
- World
- Excalibur
- Main Class
- Lancer Lv 90
I'm speechless, this is amazing!
(3)


 Reply With Quote


