Navigating the Series:
Go to Guide I: Introduction to Creative Placement Techniques
Guide II: Deeper into Creative Placement Techniques
Welcome back to our decorating series! In this continuation, we’ll be looking at several resources and new techniques to help you uncover more not-so-obvious tools on your way to becoming a prolific Eorzean decorator.
Improve Your Style II:
Basic Resources: Planning & Discovery for Decorators
[⭐⭐] Snap-Behind for Walls
[⭐⭐⭐] Walls? What Walls?
[⭐⭐⭐] Tumbling All Over!
How do we use Star difficulties?
⭐ Beginner Trick ➞ Accessible to almost any homeowner within 1 - 2 clicks, use it everywhere!
⭐⭐ Experienced Trick ➞ Accessible to anyone with patience, requires careful positioning and some experimentation for new furnishing combinations
⭐⭐⭐ Masters Trick ➞ For the most complex decorating projects, relies on multiple setup tricks and can take several hours to master use
⭐⭐⭐⭐ Pure Luck ➞ Reserved for tricks where we have only been able to replicate it in a few special cases so far, such as a specific house plot or specific character races
Just want some inspiration or pictures to enjoy?
Visit our screenshot gallery showing a collection of practical uses for these tricks at the Pomwreath design studio
Basic Resources: Planning & Discovery for Decorators
For players who want to buy decorations without resorting to highway robbery
Selecting and acquiring furnishings can often be the largest hurdle to trying new decorating ideas, even for long-time players and experienced crafters. To make that a bit easier for you, we’d like to share a few of the online resources (and their creators) who can be a decorator’s best friends!
en.ff14housing.com (original in Japanese at ff14housing.com) by an unidentified Eorzean
The first hurdle for new ideas is often just knowing what’s out there. Crafting a copy of every single furnishing is too cumbersome, so FF14Housing offers a quick way to look for what’s new or that you’ve overlooked in the past. Patch notes often leave out details on new furnishings, so be sure to check here often.
ffxivcrafting.com/recipes (and Crafting List calculator) by Sakhr Ruh’wah of Ultros
The second hurdle, after you find some inspiring ideas, is picking whether to buy or craft the furnishings yourself. This can (unfortunately) get quite tedious if you’re trying to add up ingredients and sub-ingredients for a dozen different items—but FFXIV Crafting can do that all for you with just a few clicks. This can be a real help on any kind of big crafting project, and in many cases you can watch out for the “gil bag” symbol that indicates NPC merchants around Eorzea have it available for easy purchase instead.
XIVDB.com by Josh Freeman of some distant world
XIVDB is a great go-to resource when you really need all the details. It also has comprehensive summaries of quest rewards, beast tribe merchants, and Grand Company items if you’d like to see everything they have in one easy list.
With these resources at hand, you should be ready to plan out decorating projects at any scale!
[⭐⭐] Snap-Behind for Walls
Allows decorations to be placed on inaccessible wall spacesOur techniques will be going a lot farther from the beaten path this time, so we’re going to start right off with one that no one has talked about so far. There’s a bit of guesswork involved on the final steps, so be prepared to take a few tries to get decorations lined up perfectly each time.
Eligible Items:
Wall-Mounted
Steps to Perform:
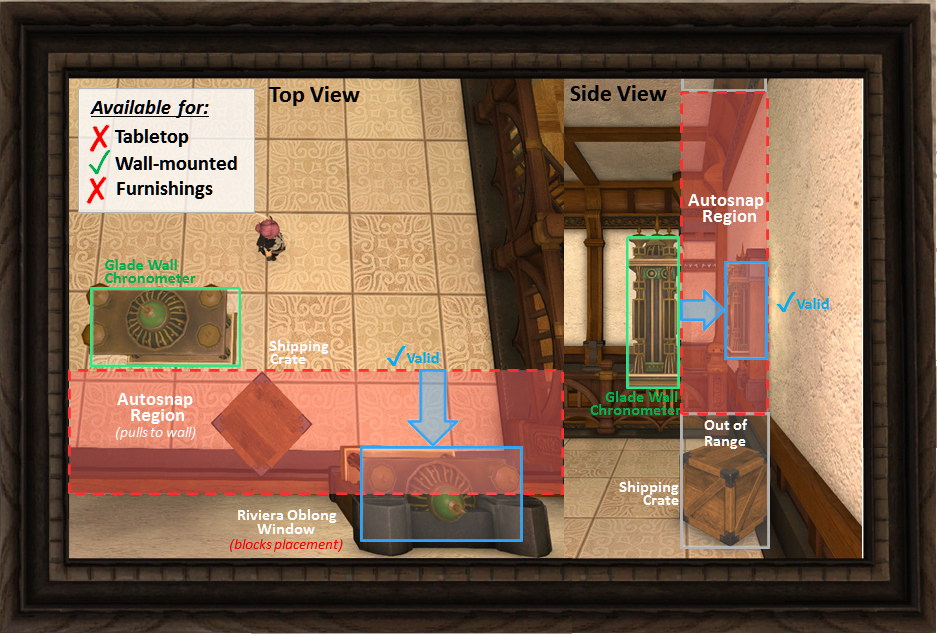
1) Pick a target location on any foundational wall that is blocked by fixed features, such as a door, window, or pillars
2) Use the Move Tool to place a partition close to that location, then put a wall-mounted object on it. Adjust until it is at the same height as your desired location
3) Use Rotate Tool to set the partition to the desired angle for your wall-mounted object. Any wall-facing angle (<90 degrees away from flat) will work for this
4) Reposition the partition as close as you can to the foundational wall with the desired location at a distance straight behind the wall-mounted object
5) Use the Floating Object technique from our first guide to remove your partition
6) Briefly exit the housing interface
Decorating Result:
When you exit the housing interface, the wall-mounted object will attempt to “autosnap” back to the foundational wall if it was Floating close enough. Fixed features are entirely ignored when it does this, so the wall-mounted object will now be set inside the window, door, or pillar as if it was a normal wall! The Move Tool can’t make positioning adjustments inside a fixed feature, so any corrections you want to make on the final location will require retrying from the partition.
[You’ve learned the Snap-Behind recipe. View blueprint?]
Advanced Usage:
Since the final location of your wall-mounted object can be difficult to judge from a distance, it often helps to enable Snap to Grid mode when setting partition angles. Autosnap pulls straight backward along that angle, so errors with the Rotate Tool will translate into unexpected movement to the right or left. If you’re using the White Partition added in patch 3.5, you may also find that extremely high or low locations (which other partitions can’t reach) fall outside the autosnap region.
[⭐⭐⭐] Walls? What Walls?
Allows wall-mounted decorations to be repositioned from any angleWouldn’t it be nice if wall-mounted objects could be placed any which way you want? Next, we’re going to share another trick no one has talked about so far that lets you do just that! It requires a bit more familiarity with housing mechanics to pull off, so we’re marking it as the first “advanced” technique in the series.
Eligible Items:
Wall-Mounted
Steps to Perform:
1) Use the Move Tool to place a partition at a convenient location, then put a wall-mounted object on it. Adjust until it is at the desired height
2) Use Rotate Tool to set the partition to any desired angle for your wall-mounted object
3) If it is a wall-facing angle (<90 degrees away from flat) then these steps will also combine with the Snap-Behind technique for placement. Otherwise the foundational walls will have no effect on final positioning
4) Use the Floating Object technique to remove your partition, then use the Rotate Tool to set that partition at a steep angle to the wall-mounted object (=/= 90 degrees)
5) Reposition your partition behind the wall-mounted object based on these two criteria so that it will re-link to the wall surface:(A) The partition does not overlap with the center of your wall-mounted object
(B) The “anchor path” of the wall-mounted object touches a valid placement location on the partition. This path extends from the centerpoint out to a set distance behind the back surface of any wall-mounted object, so it can vary significantly in size
6) Enable Counter Placement, then Select your object and Cancel it. If both criteria were met, then the wall-mounted object should now highlight when you mouse over the partition
7) Use the Move Tool to relocate your partition and wall-mounted object to the desired position. This can be anywhere within reach of the partition placement
8) Use the Floating Object technique to remove the partition a final time
9) Briefly exit the housing interface
Decorating Result:
If you chose a wall-facing angle to combine with the Snap-Behind technique, then the wall-mounted object will attempt to re-align with the foundational wall if any part of it is inside the autosnap region (excluding the anchor path). Otherwise, your object will remain Floating at your desired angle regardless of where the foundational walls or other surfaces are at!
[You’ve found a secret diagram on wall-mounted assembly. Review to prepare?]
[You’ve learned the What Walls? recipe. View blueprint?]
Advanced Usage:
While it requires some more advanced steps, this technique can be very helpful for eliminating the guesswork from Snap-Behind placement. When relocating your wall-mounted object, simply sink it into the wall to emulate the final positioning and it will ‘snap forward’ appropriately at the end. For non-facing angles, you can also use sunken placement to generate new and interesting perspectives on many otherwise-familiar items!
[⭐⭐⭐] Tumbling All Over!
Allows decorations to be flipped in impossible directions (temporary until exiting zone)What does a baby chocobo look like on its head? Can aged spirits spill if you tip them over? These are all-important questions for a very small set of rather mischievous Lalafell decorators! After countless hours of dodging Company chores and pilfering Marron Glace from the kitchens, they now have an answer for us all. Reaching your desired position can involve a lot of creative planning, so we’re marking this as the second “advanced” technique in the series.
Eligible Items:
Tabletop (via a wall shelf)
Steps to Perform:
1) Use the Move Tool to place a wall shelf at a convenient location, then put one or more tabletop objects on it
2) Place a Glade Partition near your desired location for the tabletop objects, with one of the shorter sides facing South according to the map compass. This surface will become an “angle zone” we can use to special effect
3) Enable Counter Placement and use the Move Tool to pick up your wall shelf, but continue holding onto it during all the following steps
4) Hover the wall shelf over the South-facing edge of the partition. If the edge is at the right angle, your shelf should be showing an upside-down orientation for most heights on it. Adjust the wall shelf until your tabletop objects are at the desired location
5) Disable Counter Placement. Since your mouse is busy (holding the shelf), we recommend setting some convenient keybinds for the sub-command menu for this step:
6) When the tabletop objects are no longer highlighted, Cancel your wall shelf placement
Decorating Results:
Your tabletop objects should stay right where you positioned them—and still be upside-down! The tabletop objects are now in a special ”semi-persistent” state where you can see and interact with them, including /gpose and screenshots, but they’ll eventually revert to their original positions on exiting the zone. This can unlock all sorts of creative design ideas, but there’s still a lot more you can do with it!
Steps to Elaborate (Optional):
7) Instead of placing a Glade Partition, use the Move Tool to hover your wall shelf over all sorts of surfaces around the foundational walls and fixed features of your house. The layout varies for each house size and residential district, but many features will produce their own angle zones at a variety of different orientations!
8) Once you have identified an angle zone of interest, hover the wall shelf over it again so that it is showing at the angled orientation
9) If you can draw a straight line from the orientation to your desired location, estimate the distance required and Cancel shelf placement
10) At the original positions, use the Levitating technique from our first guide to raise your tabletop objects approximately the same distance above the wall shelf. Return to hovering over the angle zone afterward
11) If your desired position is still out of reach from the angle zone, position your camera so that either the floor, a set of stairs, or the ceiling appear directly adjacent to it
12) Use the Move Tool to drag your wall shelf from the angle zone onto one of these surfaces. If you avoided touching any other wall surfaces, the wall shelf should “transfer” over to it while still showing an angled orientation
13) Reposition your wall shelf along the new surface until your tabletop objects reach the desired position. You will need to avoid touching any walls or fixed features while doing this, but you can “transfer” to other floors, stairways, or ceilings multiple times if needed
14) Once you’re there, disable Counter Placement and Cancel your shelf placement. It’s done!
Elaborated Results:
The new angled orientation you discovered will stay in a semi-persistent state, too, so have fun taking lots of screenshots while you can! We have our gaggle of Lalafell decorators working on a method to permanently save tabletop objects at these orientations, but for now they will only last until you exit the zone. Be very careful of placing any tables or rugs below your objects after they’re angled, as doing so can accidentally Levitate them at an upright orientation again.
[You’ve learned the Tumbling All Over recipe. View blueprint?]
[You’ve discovered a researcher’s notebook on Transferring angled orientations. Review additional notes?]
Advanced Usage:
When transferring your wall shelf to new surfaces, you don’t have to stay on the same floor! If the wall shelf is angled into a floor or ceiling, disabling Counter Placement will drop your tabletop items on the next level. Your objects might get lost sometimes doing this, but you can Select and Remove each one on the Indoor Furnishings menu to retrieve them instead of exiting the zone. We’ll also have some extra tricks related to this to share with you in a later guide!
Upcoming Articles and Screenshots!That’s it for our guide this time and we hope you found a lot of surprises! Our next article will be out later this summer following the excitement of the Shirogane launch, with a bevy of new tricks from the expansion and our big book of special discoveries to share.
If you’d like to look through more examples of these techniques at work, you can visit a full gallery of our recent projects from the Pomwreath design studio at:
Design Studio – Stylish Examples II.
If you missed it, we also recommend checking out the gallery from our last guide at:
Decorating Portfolio – Stylish Examples I


 Reply With Quote


