

Hello Everyone, this is my
New Strategy Guide on FFXI
Titled "Revelations"
Several new or returning players seeking information about Level 99 related hints, tips, advice, walkthroughs and many other valuable things may find this useful. The vision for creating this guide is to help those who are lost and have no idea where to pick back up or which direction to go as much content has been added.
However to those who already know the info I post here and find that they cannot gain any benefit, then this guide is not meant for you.
Veterans, Pros, or anyone with other helpful tips, information, details on strategies that would like to add anything, please feel free to leave a comment. For all other players who are using this information, I would appreciate it if you could leave a quick message or hit "Like" so that I know my strategy guide is being put to use and is helpful. Thank you.
Inside my Strategy Guide will cover many Basic 101 topics however. Please pay close attention as the purpose of touching each topic will all fall into place later on.
Taking a closer look at these basics in detail will also show you how to advance the quickest way possible and will educate you on building yourself on every aspect.
Update: For absolute beginners new to FFXI, please check out my Beginners Guide to FFXI here:
http://forum.square-enix.com/ffxi/th...eginners-Guide
Disclaimer: Due to constant updates and all other related reasons, all information posted and shared may include some Human Error. Information presented here may subject to change at any given moment. As this guide is a constant work in progress, more pieces will be added. Please understand that all information here is posted based on 100% real in-game experience. Several gear, items, atmas, and various other details included within this guide have been personally tested thoroughly for the sake of providing accurate information. Thank you.
Thread: Revelations Strategy Guide FFXI
-
07-09-2013 03:53 PM #1
Revelations Strategy Guide FFXI
(9)Last edited by Daemon; 07-22-2013 at 05:12 PM.
-
07-09-2013 03:54 PM #2
Introduction to
"Seekers Of Adoulin"
So I've notice a lot of people saying they cannot get invites to Delve. And because this can be such a huge topic I'm only going to start it off simple and possibly add more later but the purpose of this post is to "Help" those trying to get in without having the proper equipment earn whats needed to help you advance.
Many people overlook Adoulin gear, and some people skip this part and try to dive straight into delve.
It is very important that people take the time to collect these sets FIRST BEFORE YOU ATTEMPT ASKING FOR AN INVITE TO DELVE. These sets do make a noticeable difference.
At this point, you should have already completed the missions required to gain access to Seekers of Adoulin. I will be discussing about Adoulin equipment and Colonization Reives in this article.
Adoulin Equipment can be purchased at
Peacekeepers' Coalition Reward Bayld Vendor NPC
Location: Eastern Adoulin (F-7) Vesca
These gears can further be upgraded with Augments to give you extra MP.
Augmented with Coalition Grease purchased for 5,000 Bayld by Ugtoor and upgraded by Heemo-Weemo.
For starters lets examine the Orvail Set.
Seekers of Adoulin - Orvail set
LV.99 WHM/BLM/RDM/BRD/SMN/BLU/PUP/SCH/GEO/RUN
Orvail Corona
DEF:30 MND+13 CHR+14 Magic Accuracy +8 MP Recovery +4
Orvail Robe
DEF:54 INT+18 MND+18 CHR+18 Enmity -5 Adds "Refresh"
Orvail Cuffs
DEF:25 INT+15 CHR+15 Magic Accuracy +5 Enmity -5
Orvail Pants
DEF:43 INT+16 Magic Accuracy +6 Enhances "Fast Cast"
Orvail Souliers
DEF:22 MND+14 Magic Accuracy+8 Enmity -5
TOTAL STAT SUMMARY
Defense +174
Magic Accuracy +27
MP recovered while healing +4
Enmity -14
MND +46
INT +49
CHR +47
Adds "Refresh" effect
Enhances "Fast Cast" effect
As a mage class this set has very high INT and MND also with high amounts of Magic Accuracy. I believe CHR is great for Bard. This set also has a nice amount of Defense. With max skills, Merits pumped into INT, I was able to land Gravity 1 on monsters in Adoulin.
Now lets examine the Thurandaut Set.
Seekers of Adoulin - Thurandaut Set
LV.99 MNK/THF/RNG/NIN/BLU/COR/PUP/DNC/RUN
Thurandaut Chapeau
DEF: 35 STR +13 DEX +13 Accuracy +10 Enhances "Dual Wield" Effect
Thurandaut Tabard
DEF:64 STR+17 AGI+17 Attack +15 Haste+5%
Thurandaunt Gloves
DEF:29 DEX+14 AGI+14 Accuracy+10 Haste+3%
Thurandaut Tights
DEF:48 AGI+17 Ranged Accuracy+17 Enmity-5
Thurandaut Boots
DEF:27 VIT+14 MND+14 Physical damage taken -3% Haste+3%
TOTAL STAT SUMMARY
Defense +203
Accuracy +20
Attack +15
Ranged Accuracy +17
STR +30
DEX +44
VIT +14
MND +14
AGI +31
Haste +11%
Physical Damage Taken -3%
Enmity -5
Enhances "Dual Wield" effect
Awesome defense, accuracy, haste, DEX and other beneficial stats such as Duel Wield. -PDT on feet is great as this will allow jobs such as RUN & BLU to wear Blood Cuisses for walk speed.
Now lets examine the Karieyh Set.
Seekers of Adoulin - Karieyh Set
LV. 99 WAR/PLD/DRK/BST/SAM/DRG
Karieyh Morion [Head]
DEF:38 STR+16 DEX+16 Accuracy+10 Haste +6%
Karieyh Haubert [Body]
DEF:79 STR+18 DEX+18 Attack+25 Double Attack +2%
Karieyh Moufles [Hands]
DEF:33 DEX+14 VIT+14 Accuracy+10 Haste +4%
Karieyh Brayettes [Legs]
DEF:52 MP+65 STR+16 VIT+16 Attack+20
Karieyh Sollerets [Feet]
DEF:30 STR+11 DEX+11 VIT+11Accuracy+10 Attack+10 Store TP+5
TOTAL STAT SUMMARY
DEF:232
MP+65
STR+61
DEX+59
VIT+41
Accuracy+30
Attack+55
Haste+10%
"Store TP"+5
"Double Attack"+2%
Again another great set with nice defense, awesome attack, good accuracy, STR looking good with Haste. So these Gears are not bad at all.
With the Current Update, Reives are now easier to participate in, obtaining Bayld has been improved, with the current news that the cost of these sets are now lower than before.
New Update July 2013
The amount of bayld needed to receive the following pieces of equipment has been lowered:
Karieyh Morion / Karieyh Haubert / Karieyh Sollerets / Karieyh Brayettes / Karieyh Moufles
Thurandaut Chapeau / Thurandaut Tabard / Thurandaut Boots / Thurandaut Tights / Thurandaut Gloves
Orvail Corona / Orvail Robe / Orvail Souliers / Orvail Pants / Orvail Cuffs
Coalition Shield / Orvail Gloves / Vineslash Cesti / Coalition Dirk / Coalition Blade
Coalition Sword / Coalition Axe / Trunkcleaver / Fieldrazer Scythe / Coalition Lance / Kotekirigo
Kashiwadachi / Coalition Rod / Sortilevel Staff / Avitap Pole / Coalition Bow / Shadeshot Gun
By doing Pioneers Coalition in Western Adoulin
You can do the quest "Clear the way" using 3 tags each Colonization Reive. This will net you 1,800 Bayld.
(Don't forget to run back to the Coalition npc to obtain your reward and select another 3 tags for Clear the way.)
In order to deal damage to roots you need to have "Logging" Key item. To obtain this you must participate in atleast 1 Coalition Reives and then speak with the NPC Elmric in Ceizack battlegrounds K-7.
Colonization Reives/Pioneer Coalition
Tip: When doing colonization reives, pay attention to the YELLOW messages. You will see a messages appear such as "Enhancing Support"
When that message appears, cast enhancing spells such as Haste on other people that way you earn a small bonus of Bayld during the fight.
Carry a nice -pdt set so you can survive better and also tank when you see the yellow message say "Damage Taken" which also applies to DD and any other job.
I also highly suggest doing Reives during a time where there are not too many people rushing to destroy the root as Bayld is meant to be earned over time.
With 15 Tags and the amount of Bayld you can earn during Colonization Reives, you should be able to earn enough Bayld to buy 2-3 pieces of gear in 1 day.
I had absolutely no problem getting invites as a WHM, RDM, SCH, BRD using the Orvail set and people shouldn't have a problem with you either as Plasm farming is NOT NM Boss farming which will require you to have other gears from AH, AF, and other content areas.(3)Last edited by Daemon; 07-12-2013 at 05:10 AM.
-
07-09-2013 03:55 PM #3
Earning Your Wages Lv. 99
Money Issue? Here let's see how we can fix that!
One of the the posts I saw earlier was that someone said they couldn't get invites to Delve because they didn't have the spell Arise.
And we all know that it's very hard to find good current Gil Farming Guides. So I will give you some tips on how to reach your goal and earn up to 5 mil in 1 day.
*Tested and proven more than once.*
Yes as in 5,000,000 Gil.
First off you need to be open minded and level the proper jobs. As the way this game functions, different jobs can most likely serve different purposes.
The 2 jobs you will need is Beastmaster and Thief.
Use online forums such as FFXIAH to look up the current items that are popular. As a Thief with max Treasure Hunter, you can farm the current quest item Blood Thread,. Which is used for coalition quests. Due to the respect of others I will not post locations but im sure you have the ability to look it up
Voidwatch in its current state, Morta for riftcinder and Qilin for Heavy Metal Pouches are currently rising in price.
Beastmaster
Ok here's where the fun begins. Beastmaster is the solo job that can net you tons of gil. Save all your seals? 99 Kindred Seal NM you can purchase 1 Themesis orb and do "Horns of War" to fight Chlevnik. This will drop "Beastly Shank" at 100% drop rate. Prices Vary on every server so I will not list any prices, the rest is for you to explore.
You can also convert all other seals and exchange those for Kindred Seals in Port Jeuno from the NPC Shami.
Limbus By taking Teleport Dem you can enter Apollyon NW and solo farm Ancient Beastcoins and Chips. Each run can net you about 50-60 Coins. And Magenta Chip at 100% drop rate which can either be sold or exchanged at the NPC that sells you detergent for 5 coins.
Dynamis Buburimu from 00:00 - 08:00 Birds, 08:00 - 16:00 Mandragora, 16:00 - 00:00 Scorpions on a decently geared BST you can net 150 currency, on a very well geared BST 250+ currency.
Pet: Falcorr
Subjob: Dancer
(These timed mobs are Job Ability Procs)
Now here is a good tip that people will not tell you. Before entering Dyna, it is wise to buy a pair of Sprint shoes from the past. Before entering Dyna use the Sprint shoes so you will have walk speed to help you find TE faster. If you happen to have a pair of Skadi boots, then both Sprint shoes buff and Skadi shoes will both stack. Time is very important and the faster you can move around the quicker you can start farming and earn more currency.
Also carry Silent Oils and Prism Powder. This prevents you from having to Jig every few seconds which could put you in danger if you are in the middle of mobs. It's also a huge time saver.
I also suggest carrying Food as it always makes a difference when you have extra stats to boost your damage.
Also carrying Vile Elixer+1 and Icarus wings can help you in emergency situations as Icarus wing can give you instant TP to help you Use Curing Waltz III.
Walk of the Echoes
You can play any job you like however WoE is the Playground for Summoners as all pet abilities such as Fleetwind AOE regardless of being in a party or not. Beastmaster can do well but has limitations due to Call Beast Recast Timer.
Several people may not know this, but after the recent update WoE has become a very profitable gold mine that is better than Limbus, Dyna, Salvage combined (Unless you are doing salvage II earning Linen Coin Purses)
On a side note, WoE is known to be party unfriendly so I highly suggest playing a job you can handle your own and not depend on others. If you decide to party in WoE, I also suggest being careful because if 1 person pulls more than they can handle, mobs will murder each and ever member one by one until the entire party wipes regardless of how far away you are and poses a risk to everyone else around you who are not in your party.
Several of the higher Flux such as 9/10/11/12/13/14/15 drop Liminal Residue and Devious Die Sachs which is the same as opening a Heavy Metal Pouch. Up to 20 can drop in 1 sach. With a decent team of 6-10 people you could spam some of these areas in about 20-30 minutes. So I'm sure you can do the math.
High rewards such as Flume Belt, Wind Buffet Belt, Acesor Choker come from WoE.
Some people believe in Luck, I believe in consistency, however don't give up if you didn't get something after the first 4-5 tries.
Note: You need to deal a certain amount of damage on enemies and bosses to Qualify for Max drops from Treasure Chest and if you want to earn high amounts of EXP. If you lost connection before Flux is cleared you will not be eligible to obtain any drops.
The reason I did not get into such extreme detail is because I am only trying to point you in the right direction. It's up to you to do the rest. These tips is more than enough to help you earn enough gil to purchase your needed gear and items such as Arise.(3)Last edited by Daemon; 07-12-2013 at 12:30 PM.
-
07-09-2013 03:55 PM #4
Introduction to Equipment Sets
Many new people today do not know the importance of having different types of gear sets. So I want to explain a few things on why it serves a great purpose in survival.
For Mage classes, there are way too many different types of sets you can use that it's very difficult to decide which ones to carry. From -PDT, MDEF, MAB, Fast Cast, Refresh, Conserve MP, MP recovery, Cure Potency, Cure Spell Casting, Enfeebling, Enhancing, and so on.
I will only give you 1 Example and then you can see how the other gears can play important roles.
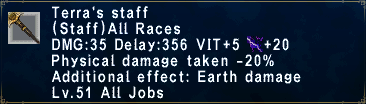
Let's start off with -PDT Equipment. Which I highly believe every single job should carry this one set at all times.
For Red Mage, Blue Mage, there are many gears available for -PDT. However ALL mage classes can cap -PDT at 50%.
Terra's Staff (Physical Damage Taken -20%)
Flume Belt (Physical Damage Taken -4%)

Umbra Cape (Physical Damage Taken -6%)

Dark Ring X2 (Physical Damage -6% on each Ring)

Twilight Torque (Physical Damage Taken -5%)

Lefay Brias (Physical Damage Taken -4%)
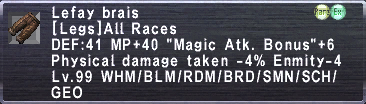
This will bring you to a total of 51% -PDT although the cap is 50%.
With Protect V and Phalanx Buff plus Boost VIT and Stoneskin you can lower damage by a huge amount allowing you to survive during moments of agro.
NOTE: Using other slots with gear that has the highest DEF can also help.
There is also a Stoneskin set that can add more strength making the buff last longer by allowing you to absorb more damage before it wears off.
Sand Mantle (Petrification: Physical Damage Taken -20%)
In situations where a boss petrifies you, you can put this on with -Pdt gear to lower damage being delt to you. If you do not own enough -PDT gear to cap 50% then this can be a very cheap option available when fighting such enemies or bosses that Petrify you.
For WHM sometimes curing can cause too much Enmity turning mobs away from DD on to you, switching over to -PDT gear will not only allow you to lower the damage of the attack, but will allow you to survive in most cases, Use less MP for curing yourself to stay alive.
This also is great for DD in situations where there is only 1 Healer, Healer is low on MP, or Tanker dies and Some DD is left to tank mobs, therefore sacrificing some Damage dealing armor and using -PDT will help the entire party not only helping mages use less MP for cure but will also help the Tanker get back up and Unweaken. This can also help Mages recover MP better.
And... well... Bards in Delve Pulling monsters and using Lullaby.. I'm sure you can see why I said this is a set that I highly believe everyone should have at all times.(1)Last edited by Daemon; 07-12-2013 at 01:08 AM.
-
07-09-2013 03:56 PM #5
Merit Weapon Skills & Skill Up (DD Info)
For those of you planning on DDing in Delve and do not own any REM.
Lets be realistic here. Mobs are very high level in Delve. You must have your Skills Maxed regardless. This doesn't play much of an important role for mages however because when do see a mage DD other than Blue mage?
We all know Merit Weaponskills were adjusted so you could receive 73% on the first merit. Allowing players to merit more than just 3 Weaponskills so that you may have decent damage.
However "Decent" doesn't cut it.
Any and every serious DD needs to merit Weaponskill at max level 5 regardless. Especially if you plan to DD with no REM.
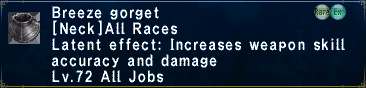
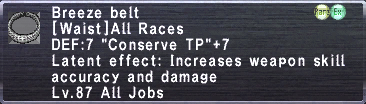
Equipment you will also need is Haste/Store TP/WS sets and a ton of Accuracy as I said before you need to hit mobs rather than miss. Also Belt/Gorget which Gorgets are quested items from Tavnazian Safehold "In the name of Science". You must have CoP missions completed up til SEA Access in order to be able to farm quest items for your Gorget.
Lets examine the Weaponskill Resolution
In order to gain access to any Merit Weaponskill you need to be level 96 and have skill level 357.
With the proper quest done allowing you to unlock Merit WS.
NOTE We will also take a moment to discuss the importance of WS equipment such as Belt/Gorget and Increase Weaponskill Damage.
Resolution WS Great sword
Description: Delivers a fivefold
This Weapon Skill's first hit fTP is duplicated for all additional hits.
Aligned with the Breeze Gorget, Thunder Gorget & Soil Gorget.
Skillchain Properties: Fragmentation/Scission
Modifiers: STR:86~100%, depending on merit points ugrades.
86%, 89.5%, 93%, 96.5%, 100%
Notice the Modifier is STR- therefore you need STR gear to increase the weaponskills damage. As for Belts and Gorget, several arguements have been made saying it does not matter whether you are using a combination of Thunder & Breeze, or Soil & Thunder & so on. As long as those elements align with the Weaponskill in question.
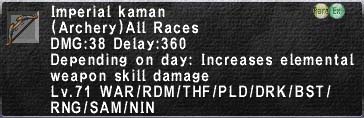
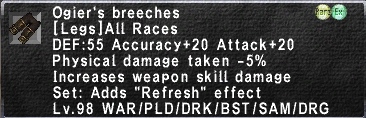
There are other gears available that can
"Increase Weaponskill Damage"
Imperial Kaman bow
Mekira-oto

Ogier's Breeches
Athos Gloves

Of course you need a combination of STR, Attack, Accuracy, with Belt / Gorget to give you a certain overall outcome in damage based with buffs and food. But make sure you are following the weaponskills moderator.
Also know that the base dmg of the weapon you are equipping contributes to your Weaponskills damage as well.
Gorgets/Belt can make a huge difference depending on the ws and moderator and its very important to have these.
Every Elemental Gorget Has A Matching Belt
Weaponry Skill Up 101
Some people cannot afford HQ food but I will say if you are a damage freak HQ food can make a noticeable difference. In the case of Skillup food though, don't hold back on buying these as they are really that helpful in skilling up fast.
If some of you are having a hard time skilling up, you can do Gov tabs in Zeruhn mines in Bastok and hunt for Prousse Ring which drop from brown chest.
Prousse Ring
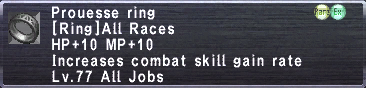
[Ring] All Races
HP +10 MP +10
Increase rate of combat skill gains
Lv. 77 All Jobs
There are skill up foods in AH such as Saltena, Elshena and Montagna. Under Food/Bread & Rice.
Saltena
Skill rate 1.2x
Elshena
Skill rate 1.4x
Montagna
Skill rate 1.6x
Maringna
Skill rate 1.8x
More Info: http://wiki.bluegartr.com/bg/Skill_Up_Foods
These foods can be expensive but with the gil guide I've included and the power of Atmas, Cruor Buffs and temp items from Abby, skilling up should be a breeze.(1)Last edited by Daemon; 07-12-2013 at 07:27 AM.
-
07-09-2013 03:56 PM #6
Brachyura Earring & Sheltered Ring
Hey guys I wanted to introduce to you these 2 pieces of gear and why one of the two can be good to carry with you at all times.
Brachyura Earring

[Ear] All Races
MP+20
Enhances effect of Protect and Shell spells cast on wearer
Lv. 91 Jobs
Sheltered Ring

[Ring] All Races
Adds "Regen" effect
Enhances effect of "Protect" and "Shell" spells cast on wearer
Lv.96 All Jobs
Before a mage in your group casts Protect & Shell equipping one of these items will allow you to receive extra Defence.
You can unequip after the spell has been casted. But lets take a closer look as how this is good.
Protectra +2 DEF
Protectra II +4 DEF
Protectra III +6 DEF
Protectra IV +8 DEF
Protectra V +10 DEF
Shellra -.4% MDT
Shellra II -.8% MDT
Shellra III -1.2% MDT
Shellra IV -1.6% MDT
Shellra V -2% MDT
This means if Protect V is casted on you, you will receive an additional +10 DEF added on top of the original spells given defense.
Terms: DEF = Defense MDT= Magic Damage Taken.
These stats will stay until the spell wears off regardless if you take off the Ring or Earring however you must be wearing one of the two before the spell is casted on you. Wearing both of these items at the same time does not stack to give you double stats.
Tip: Little details such as these can add up to making you more powerful in survival. So please do not overlook this.(1)Last edited by Daemon; 07-10-2013 at 02:25 AM.
-
07-09-2013 03:57 PM #7
Introduction to Magic Skill Up
One of the best spells to use for skilling up Enfeebling Magic is the spell Dia.
Barspells for Enhancing
Cure for Healing
Banish for Divine
Bio for Dark Magic
Bards can cycle through Therenody & Etudes
Cycling through different low tier spells for Elemental Magic
Anyways I will explain to you how you can level up enfeebling magic for our example.
First lets take a look at the available skillup food options.
Under Food/Bread & Rice
Stuffed Pitaru
Skill rate 1.2x
Poultry Pitaru
Skill rate 1.4x
Seafood Pitaru
Skill rate 1.6x
B.E.W. Pitaru
Skill rate 1.8x
More Info: http://wiki.bluegartr.com/bg/Skill_Up_Foods
(Make sure you check which food is for Offense Magic and Non-Offense Magic)
While spamming Dia on mobs nonstop using skill up food according to the range level of each food, You can level up enfeebling magic pretty fast so please do not hold back on using these foods.
At higher skill levels 300+, spamming on bosses or highest level mobs seem to give you higher skill points. So I will give you the example of how you can survive and achieve this in Abyssea La Theine Plateau off the NM Megamaw Mikey.
First off Megamaw Mikey likes to cast Stone spells such as Stone V and Stonega III. In order to survive these spells you will need the following:
Atma of the Earth Wyrm: Earth Resist+: Superior (+100), Damage Taken-: Minor (+10%),
Atma of the Minikin Monstrosity: Intelligence+: Superior (+50),
Refresh+: Major (10MP/tick), Enmity -: Minor (+value)
Atma of the Vicissitude : Defense+:Major (+40), "Magic Def. Bonus":Minor (+value), "Regen":Major (15HP/tick).
Notice that these atmas give you Defense, Regen, Magic Defense Bonus and Resistance to Earth.
With Barstone, Shell V you should be able to lower the damage to a very extreme minimal. Keeping Stoneskin up also helps. There are also other gears such as Merman earring, Augmented Dark Rings from Gold Chests in Konschtat Highlands Abyssea, Slipor Sash and Magavan clogs available to give you additional Magic Defense Bonus.
Bards can also use Earth Carols.(1)Last edited by Daemon; 07-17-2013 at 06:48 PM.
-
07-09-2013 03:58 PM #8
Empyrean Weapon Trials
One of the most horrible parts of doing Emp trials is the NM camping phase. So I wanted to give you some tips on how you can achieve this without wasting your entire day. First off motivation comes from within and only you have the ability to reach your goals if you put your mind to it. So don't give up and be consistent with a little bit of time management you should be able to accomplish this.
Several of these Trials have NMs that take several hours to spawn. Some maps spawn the same NM in 2 areas of the map.
Tip: Notorious monsters have place holders. Usually 1 mob on the list.
I highly suggest subbing a job with "Wide Scan" as this will help you find them faster and save you time.
For Lottery Spawn NMs, here are a few suggestions.
1. Check the map to see if people are there farming the same trial as you.
2. Find out what time of day or morning the map is empty.
3. Know how long the NM takes to spawn. For example Gargantua takes 1-7 Hours.
Have you ever camped a spot where you killed 1 place holder and the NM popped 5 minutes later? Most likely the respawn timer of that NM passed without anyone farming lottery mobs during that period.
This is why I listed that you find out the time when the map is empty.
Kill the place holder for about 3-5 rounds, if the NM does not spawn, leave the map and come back later.
If you repeat this strategy during the day when the map is empty you can manage your time to doing other things than sit all day waiting for 1 NM to pop.
For NMs that take several hours, break it down. Say the NM can spawn up to 7 hours. You can kill the place holder a few times and if the NM does not spawn, come back 2 hours later and repeat this during the 7 hour phase. Again this works well during the time the map is empty.
This also is a good technique when doing multiple trials.
Check before you log out, you may get lucky and pop the trial NM if no one has been on the map farming several hours beforehand.
Voidwalker
For doing this part of the trial you are required to have color abbysite for T2 and a specific color for T3. In the case of T2 Color abbysite I would like to explain that you can pop the T2 VNM a few times but risk the chance of changing the abbysite into T3. Always make sure you are carrying a Clear abbysite T1 while doing T2. Once your T2 changes into T3, do not spawn the T3 VNM so you can work on changing your T1 Abbysite into a Color Abbysite. That way once your abbysite changes to T2 you can continue to spawn T2 VNMs as many times as you want until the trial ends.
For those of you working on T3 trials, the best way to accomplish this is to either buy T3 pops or request a group of LS friends to help you as T3 VNMs can only be spawned once with one T3 Abbysite.
Now that you have finished the VNM phase you now need to work on collecting items from NMs such as Sedna, Sobek, Briarius.
For you to pass these trials quickly you will need to lead your own parties as many players need these trial items, it's very difficult to find anyone willing to give them to you. Several of these trial NMs can attract many players as +2's, Atma, Gear and Zone Boss Wins can help you find members wanting to join quickly.
There are 3 approaches to doing these trials. You can either farm Key Items through NMs, some Key items can be farmed through Gold Chest, or you can shout in town asking players to sell you their KI's and pop it for you.
With the Gil Guide I've included in the earlier post, you should be able to make enough gil to buy Kis from players which will save you a huge amount of time so you can earn the trial items needed and be on your way to earning your new EMP Weapon.
One of my trials was collecting Kukulkan Fangs. I was able to collect 25 fangs in 1 day. So it's possible to breeze through these trials depending on your drive.
Important Note: Although many arguments are being made that Empyrean Weapons are a waste of time due to Delve. I highly encourage you to do them anyway. Having an extra weaponskill doesn't hurt to have. Maybe in the future "IF " SE decides to allow players to unlock the weaponskill, atleast you will be prepared to take advantage of the opportunity right away.
Tip: Now would be the best time to do them, since many players have lost interest in doing these trials. All maps may have less competition. Therefore making it easier to follow the above advice on managing your time to get them done.(1)Last edited by Daemon; 07-11-2013 at 02:39 AM.
-
07-09-2013 03:58 PM #9
Networking in FFXI
Many people wonder why they can't find a party or cannot get a group together. Even several players sit in town all day shouting endlessly. For one, you are dealing with people who don't know each other.
Ever see those people on the street asking for money? Begging for help? Maybe someone is trying to sell you something? Most of the time people ignore the person and carry on. Had it been someone you actually knew, then thats a different story.
I'm going to give you some Networking tips to help you avoid being that person who needs help and can't find it.
First off you have tools in front of you, use them.
Linkshell, Friendslist, Search.
1. Add friends to your list every opportunity you get from EXP parties, VW events, LS Friends etc.
2. Offer to help others around you than be that guy always asking for help and never helping anyone in return.
3. Bargain with friends, You help me with this trial and I'll help you with your seal hunt.
4. Always keep your promises and never let anyone down. How many times someone said they would help but something came up and eventually never got back to you? (Either they were never seriously going to help you or their needs were more important than attending to you.)
5. Do free favors for your friends and LS mates
6. Reward people for helping you by doing something nice in return such as sending that person a stack of Meat mithkabobs or a stack of silent oils.
7. Stick around till everyone gets what they came for rather than leaving after getting what you wanted.
8. Don't leave your friends hanging
Now lets sum up these 8 points
When you need help with something, you now have many friends in your list because you've spent so much time in parties inviting several cool people. Since you've offered to help others around you people know how awesome you are and how you've helped them to get their things done. They know you are not the person whose always asking for help and are very grateful that you've done free favors for them such as helped them enter Salvage rather having them spend 100k asking a stranger. They were surprised when they found a stack of prism powder in their moghouse the very next day after helping you the night before and they noticed while a few people left after getting their items, you stuck around and stayed til they got theirs. They know you never leave them hanging so there is no reason to say "NO" when you needed a favor.
As for using search function, when you need a job, sometimes one of your friends or someone you partied with before a few times thats not on your friendslist could be somewhere on another map and didn't see your shout in town.
Also add people who have unique jobs that you know you might need when the time comes.
Instead of asking in LS for help, open the list and ask them in private. When you are asking in LS people don't feel obligated to answer you.
Sometimes when you can't find a Blu for your VW party, having lots of friends you've added can help or /Sea Blu and check the list. Knowing a lot of people helps in this situation. You'd be surprised at how many people will say yes when you ask them in private.
Tip: Once in a while it doesn't hurt to check your Friendslist and say Hi, what are you up to? Need any help?
Waiting for people to ask you to do something rather than taking the initiative to get people to do things with you can change once you've built a relationship with others on a more personal level than just hanging out with people for events and exp.
Always stay positive and never let anyone give you a reason to feel down. It's important to remember that your actions define who you are in game and some people tend to have snap judgments and be rude but there are also cultural differences that tend to give people the wrong impressions. However you should know that FFXI is a small world where we interact with each other on a daily basis.
Friendslist 101
So now you have friends on your list. Just when you thought inviting people was the tough part, here is where the real work begins and here's why.
1. Only having people on your Friendslist will get you nowhere. You need to start building a personal friendship with the people you've singled out and invited.
2. Just because you had a good time with that person once doesn't automatically mean you are best friends the moment they accepted your friends request.
3. Reason 1 & 2 should be a good enough to move on to the next part.
Here are some tips:
1.The best approach anyone can take when getting to know someone on your friendslist for the first time is to invite them to your events. Invite them often.
2. Never start off asking those you barely know if they can help you. Otherwise this will make you look like you only added them because you needed help.
3. Announce your parties as "events" and "not another one of those seal hunts again."
Example 1
"Hey buddy, I'm holding an event with some friends. We plan on taking out some bosses to help each other get some seals for AF3, thought you might be interested so I'm offering you a spot if you want in."
As oppose to..
Example 2
"Hey do you want to help me with my seal hunt? I can't find anybody lol. I need my AF3 boots done. Can you please help me?"
4. Encourage your friends to join and that you can help them progress.
"Hey Dave, If you need help with AF3, come party us, I'm sure we could help you get a few done tonight.
5. Invite your friends to other things such as Missions, Farming, Questing, EXP and not just for moments you need help.
6. When partying with others, this event is not about you anymore. You must base your attention on everyone invited. That includes making a change in your plans for the purpose of giving everyone an equal opportunity to be rewarded for putting in the same time as everyone else so no one feels unfair or left out.
FFXI is a small world where you interact with the same people everyday. What you do with your time and how you spend it with people falls in your hands.
Remember in this game most people have millions of things they need to get done too and many wont help you unless they know you've helped them.(1)Last edited by Daemon; 07-12-2013 at 04:21 AM.
-
07-09-2013 03:59 PM #10
Job Ability and Magic Strategy 101
The purpose of this post is for me to show you some basic strategies that some people overlook.
White Mage Flash
Severely reduces accuracy compared to Blind, the effect weakens over time until it wears off.
Normal mobs have the ability to resist Flash, although this is extremely rare.
Duration is subject to resists and partial-resists, though can last up to 12 seconds if completely unresisted.
Stacks with Blind.
Does not overwrite itself. If the target is already flashed it will fail to take effect.
Acquires a significant amount of Enmity.
Automatons with a Flashbulb equipped can use a non-magic version of Flash and, therefore, can not be reflected or absorbed by shadows.
This status effect cannot be removed by Blindna, but can be removed by Erase, Esuna or Healing Waltz.
Lets be real here, how many times have we seen the majority of WHM only use this spell during Voidwatch for Proc?
If you observe carefully it says "Severely Reduces Accuracy"
There are 2 main purposes for using this spell. When Ninja needs to recast Utsusemi and when a monster is about to use TP Skill. Why? Because not only does it blind, but it also severely reduces accuracy therefore could possibly make the monster miss. Although enmity is high, today DD deals massive amounts of damage with WS, so WHM should not gain hate as easily as before when the spell first came out.
Thief Collaborator
Steals one quarter of the target party member's enmity and redirects it to the thief.
Obtained: Thief Level 65
Recast Time: 1:00
Duration: Instant
Distance: 12.6
So we all know this is highly used on mages to steal enmity right? But there are other purposes for this. Say you are fighting Kukulkan and the NM has Petrifying Eyes up, your tanker is now frozen and cannot move until someone can make the NM turn away. Thief on the other side of the NM with back facing boss can use Collaborator to steal enmity from the tanker making NM turn away so your tanker can unfreeze. This works well for Terrorize also.
Red Mage Spontaneity
Reduces casting time for the next magic spell the target casts.
Obtained: Red Mage Level 95
Recast Time: 10:00
Duration: 1:00
This is one of the best survival spells Redmage has. For one, if you are a Nuker build and your Aquaveil wore off, using this with Aquaviel can instant cast the spell so you won't constantly be interrupted from being hit. This works great for Stoneskin and Raise. Instant raise the most important jobs in your alliance say tanker or WHM.
Rune Fencer Ward: Liement
Absorbs elemental damage. The types of elemental damage absorbed depend on the runes you harbor.
Obtained: Rune Fencer Level 85
Recast Time: 3:00
Duration: 0:10
One of the best abilities Rune Fencer has. When a monster is casting a very strong Magic Spell such as Blizzard 5, quickly using this before the spell is casted will turn the Magic Damage being delt into HP healing you. Great in situations where your HP is very low and lack the ability to Cure Yourself.
The reason I pointed this out, each job has special abilities that people don't look into close enough, I've pointed out how important it is to know your abilities and spells to the fullest and sometimes looking at the description helps.(1)Last edited by Daemon; 07-12-2013 at 04:23 AM.
 Reply With Quote